


STM32CubeIDE, lwIP / FreeRTOS step by step
Overview
This tutorial is a step-by-step guide on how to build a Mongoose-based Web UI dashboard on a NUCLEO development board using the STM32CubeIDE development environment with lwIP and FreeRTOS.
We'll start from scratch, first creating a new STM32CubeIDE project and then following these steps:
- Blink an LED
- Send text through a USART
- Redirect printf() output to a USART
- Change the system clock to the highest frequency
- Enable the Ethernet MAC Controller
- Configure FreeRTOS and lwIP with the PHY
- Blink an LED using the OS
- Integrate Mongoose Library into our project
- Configure FreeRTOS memory heap
- Implement a simple web server
- Implement the full device dashboard
Project creation, steps 1 to 5
Project creation and steps 1 to 5 belong to this step by step tutorial. Here we will fork and continue from a different step 6.
Please note that, in step 4, using a different system time source for the HAL is mandatory, as FreeRTOS will be taking over the SysTick.
Also, in this tutorial we will be using the ETH HAL driver so don't change the receive buffer size and let Cube generate the ETH IRQ Handler in step 5.
6. Configure FreeRTOS and lwIP
- At the device configuration wizard, select the
Pinout & Configurationtab. Click onMiddleware and Software Packs, then onFREERTOS, and finally selectCMSIS_V1as interface: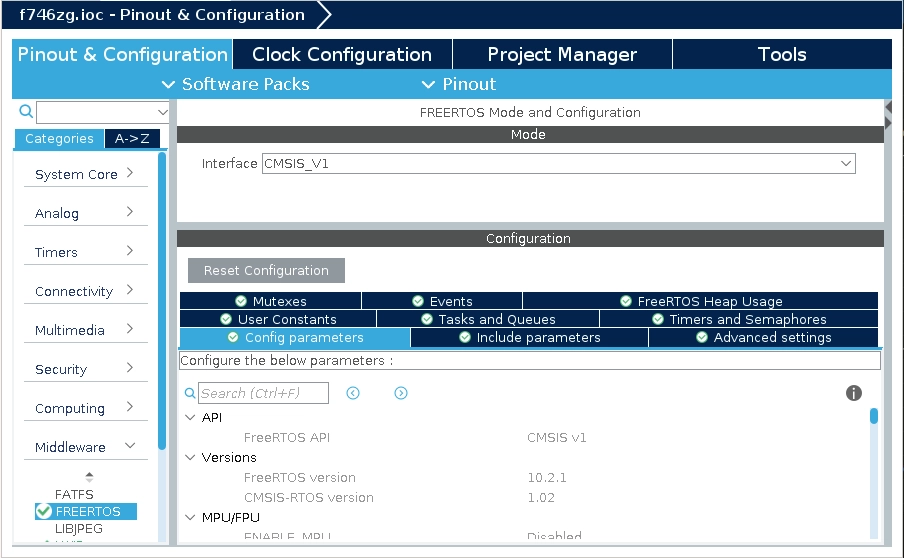 This will use CMSIS-RTOS API version 1 as an abstraction layer between FreeRTOS and the rest of the generated code, including lwIP
 - Now click on the Advanced settings section, then, on
Newlib settings, enableUSE_NEWLIB_REENTRANT: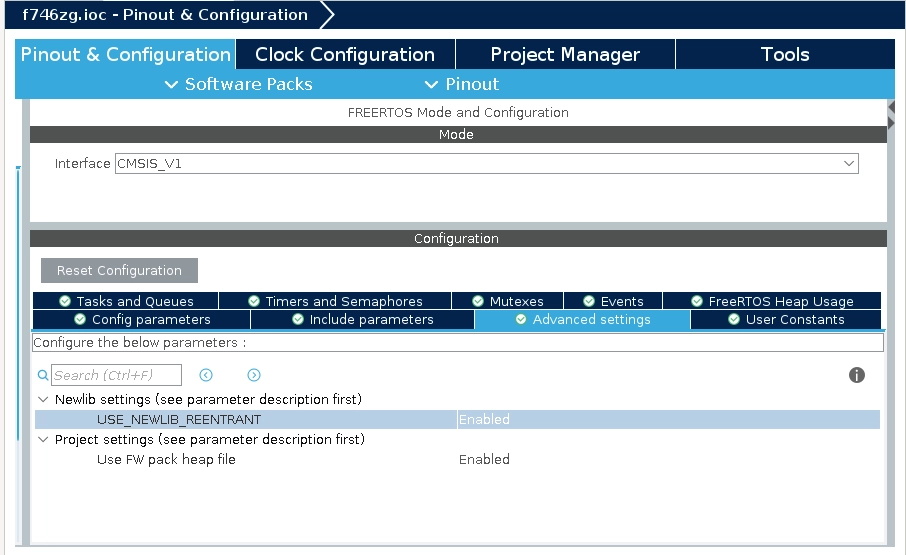
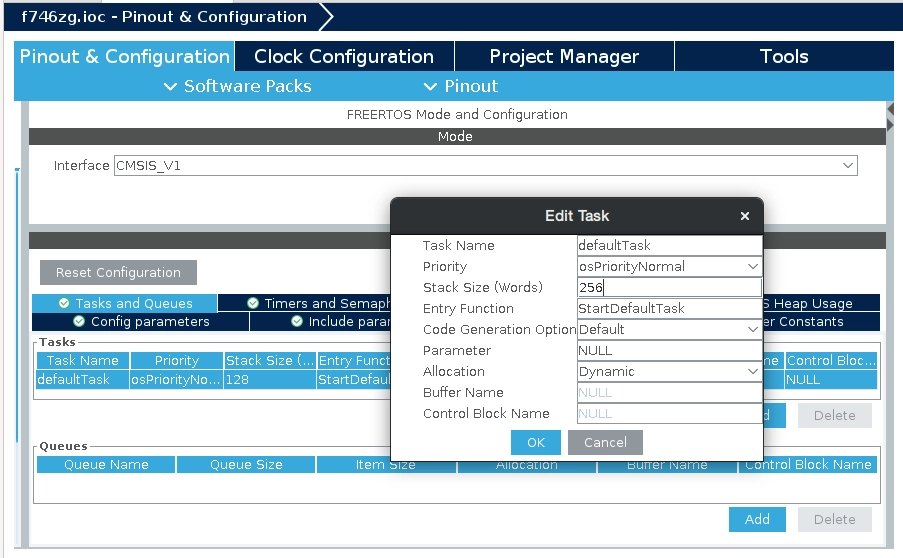
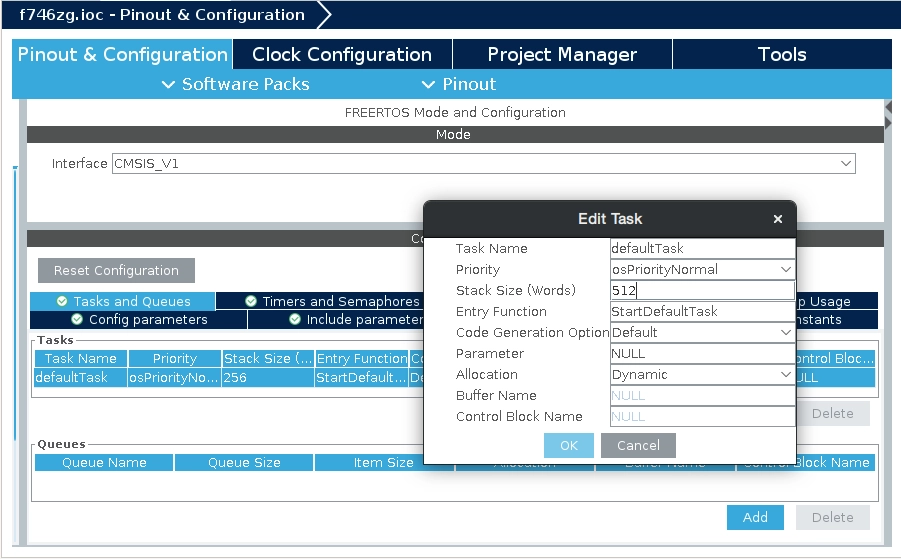
- Now go to the Tasks and Queues section and set the stack size for the only task (defaultTask) to 256 words; otherwise lwIP won't even start:
- At the device configuration wizard, on
Middleware and Software Packs, click onLWIP, and enable it. Make sure DHCP is enabled: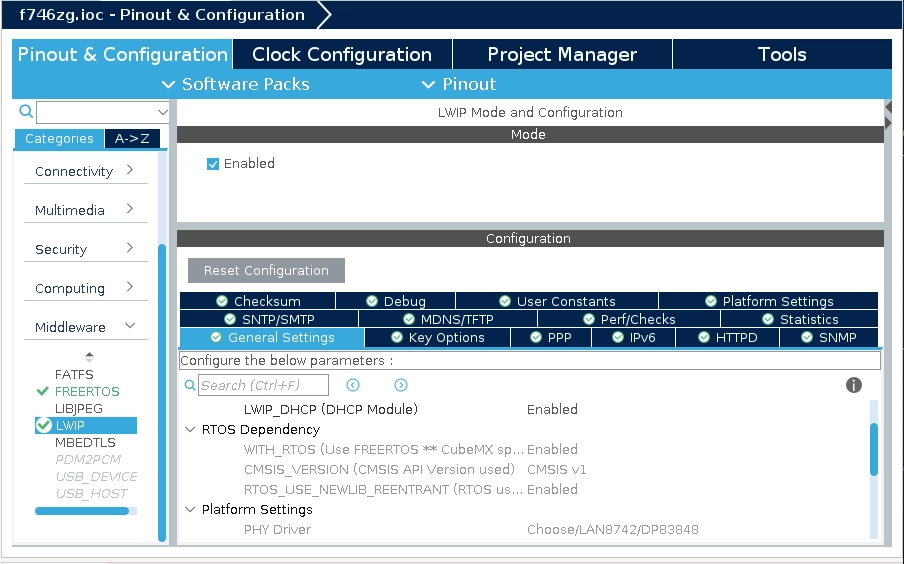
- Now click on the Platform Settings section, then on
Driver_PHY, selectLAN8742: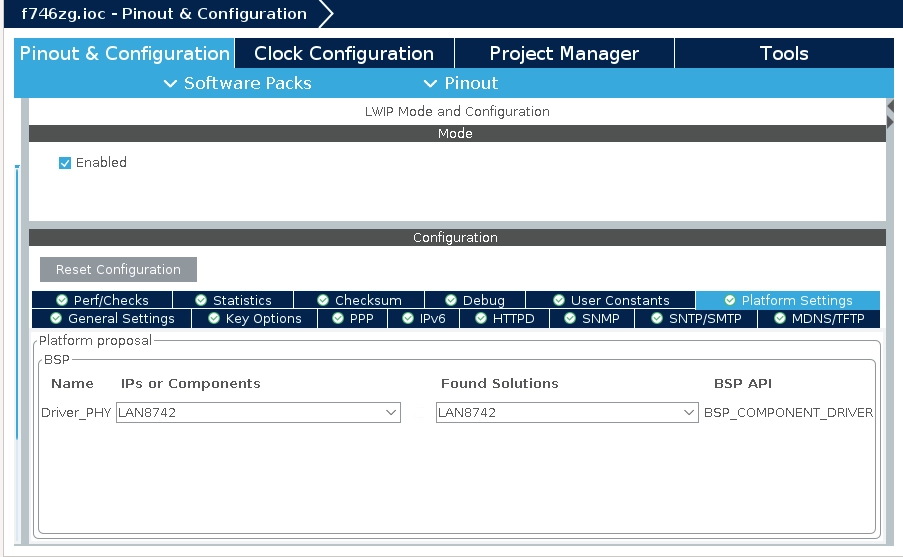
- Now click on the hammer icon, that will re-generate the base project structure and re-build it, adding support for FreeRTOS, lwIP, and the PHY chip.
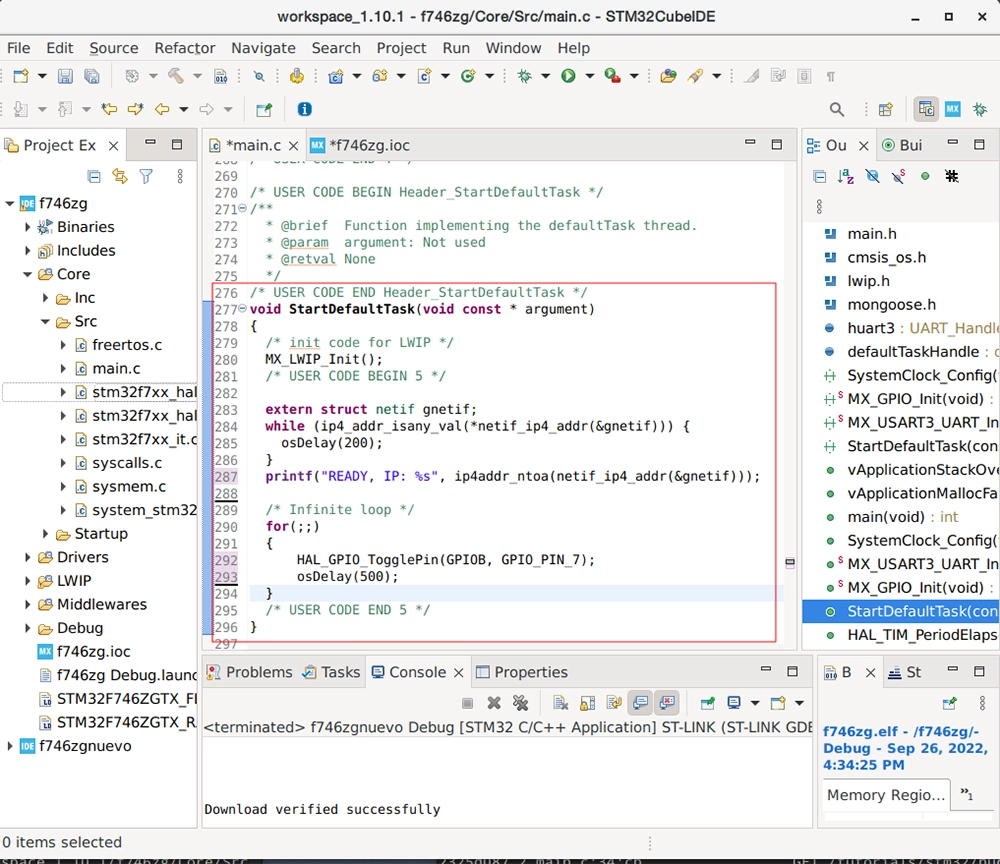
- Before we can do any tests, let's add a way to show our IP address in the log terminal. Add this to
Core/Src/main.c, in theStartDefaultTask()function:
Note that, depending on where we added our blink code, it may or may not have been preserved by CubeIDE. It doesn't really matter, as that code will not be executed as the scheduler takes over before that./* USER CODE BEGIN 5 */ extern struct netif gnetif; while (ip4_addr_isany_val(*netif_ip4_addr(&gnetif))) { osDelay(200); } printf("READY, IP: %s\n", ip4addr_ntoa(netif_ip4_addr(&gnetif))); /* Infinite loop */ - Now let's click on the green arrow icon to run the code.
- With the terminal software of your choice, configure it for 115200bps. Open the proper USB serial port and you'll see the log. Once the DHCP server in your network assigns an address to your board, you'll see it:
picocom /dev/ttyACM0 -i -b 115200 ... READY, IP: 192.168.2.10- If there are no logs, CubeIDE might have messed around with
Core/Src/syscalls.c, check it out and re-do our changes. - NOTE: If you meet something like this:
Some versions of the Cube packages may not set the lwIP netif interface up before starting DHCP; since lwIP v2.0.0 this has to be done regardless of its physical link state. If this is the case, add a call toAssertion "netif is not up, old style port?" failed at ...netif_set_up(&gnetif)inLWIP/App/lwip.c; in the user code section just before DHCP setup. Cube likes to create its tasks there so this might disappear if you later upgrade to a new version:
- If there are no logs, CubeIDE might have messed around with
- If you ping this address, it should respond
7. Blink the LED with the RTOS
- Once this is done, we can bring our blink code back in
Core/Src/main.c. This time we'll use the CMSIS-RTOS function call to instruct this task (defaultTask, in theStartDefaultTask()function) to wait for 500ms, while lwIP runs in other task:
On the Nucleo-H743ZI2 board, the LED is connected to GPIO PE1./* Infinite loop */ for(;;) { HAL_GPIO_TogglePin(GPIOB, GPIO_PIN_7); osDelay(500); } - Click on the hammer icon again, then on the green arrow icon, your board will be flashed and you should soon see the LED start blinking again
8. Integrate Mongoose
- You can download mongoose.h and mongoose.c with your browser; then drag and drop them to
Core/Inc/andCore/Src/, respectively. - You can also create new files, the header mongoose.h in
Core/Inc/and the source mongoose.c in theCore/Src/folder; and paste contents there: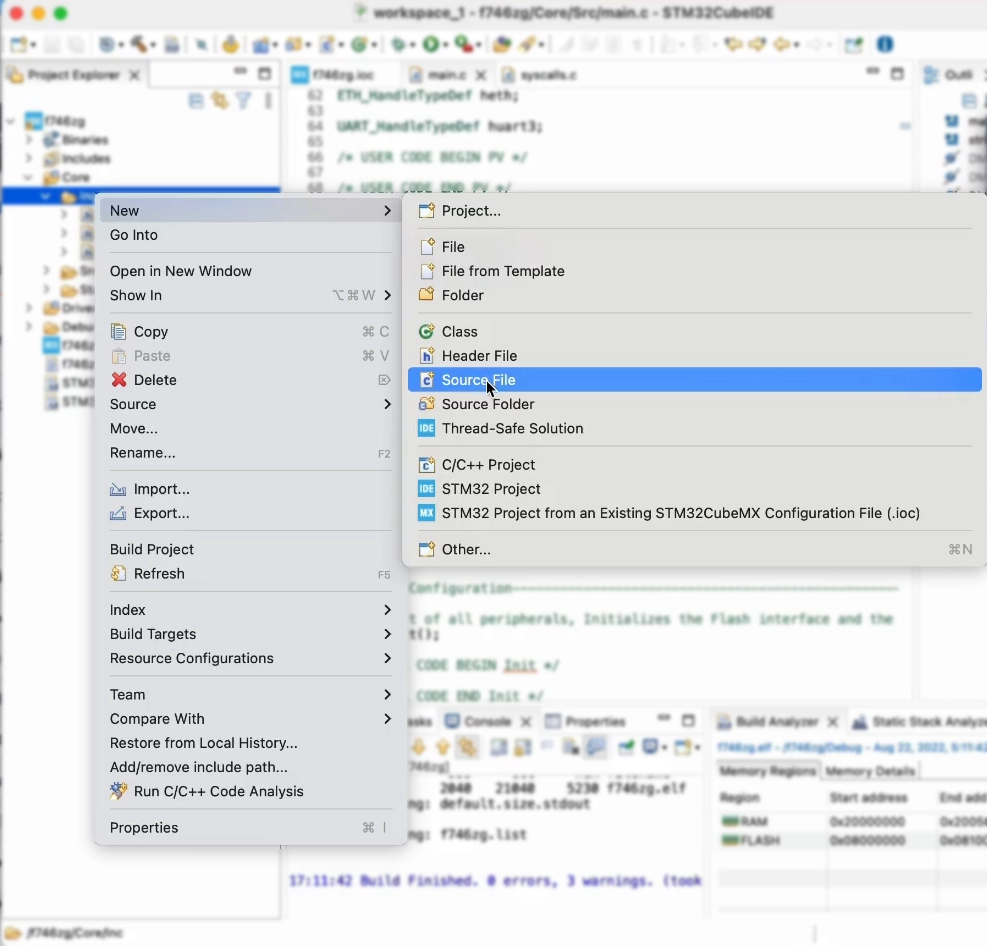
- First, let's include mongoose.h so we can call Mongoose API functions

- Now we need to tell Mongoose in which architecture it is running. This is done by defining the macro
MG_ARCHand assigning it a proper value; then we need to enable the TCP/IP stack we use. Right click on your project, clickProperties. SelectC/C++ Build, thenSettings. Click on theTool Settingstab, then selectMCU GCC Compiler, thenPreprocessor. Click on the add new symbol icon and addMG_ARCH=MG_ARCH_FREERTOS, then addMG_ENABLE_LWIP=1: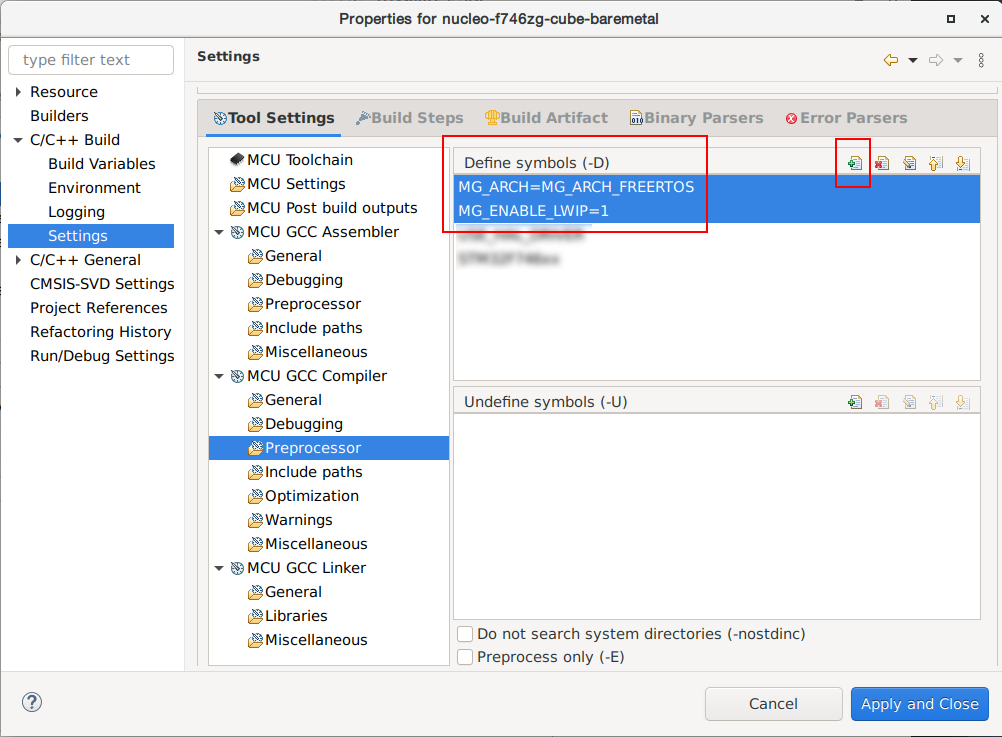 Mongoose will now allocate memory through FreeRTOS, use lwIP socket interface, and get its timing from FreeRTOS.
 - Now open
Core/Src/main.cand inside theStartDefaultTask()function, we'll initialize Mongoose. We'll also replace theprintf()call by one of the built-in Mongoose logging macros:
On the Nucleo-H743ZI2 board, the LED is connected to GPIO PE1.MG_INFO(("READY, IP: %s", ip4addr_ntoa(netif_ip4_addr(&gnetif)))); struct mg_mgr mgr; mg_mgr_init(&mgr); /* Infinite loop */ for(;;) { HAL_GPIO_TogglePin(GPIOB, GPIO_PIN_7); mg_mgr_poll(&mgr, 500); }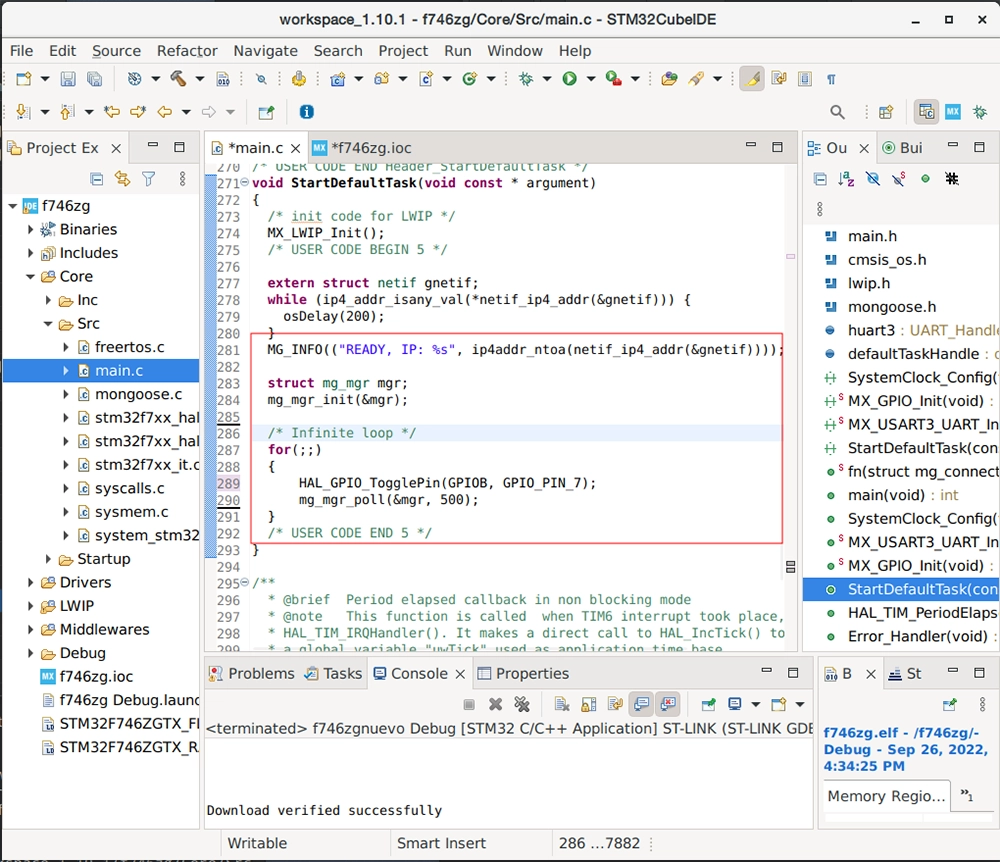
- Now click on the hammer icon to build the project. Mongoose has been integrated into our code
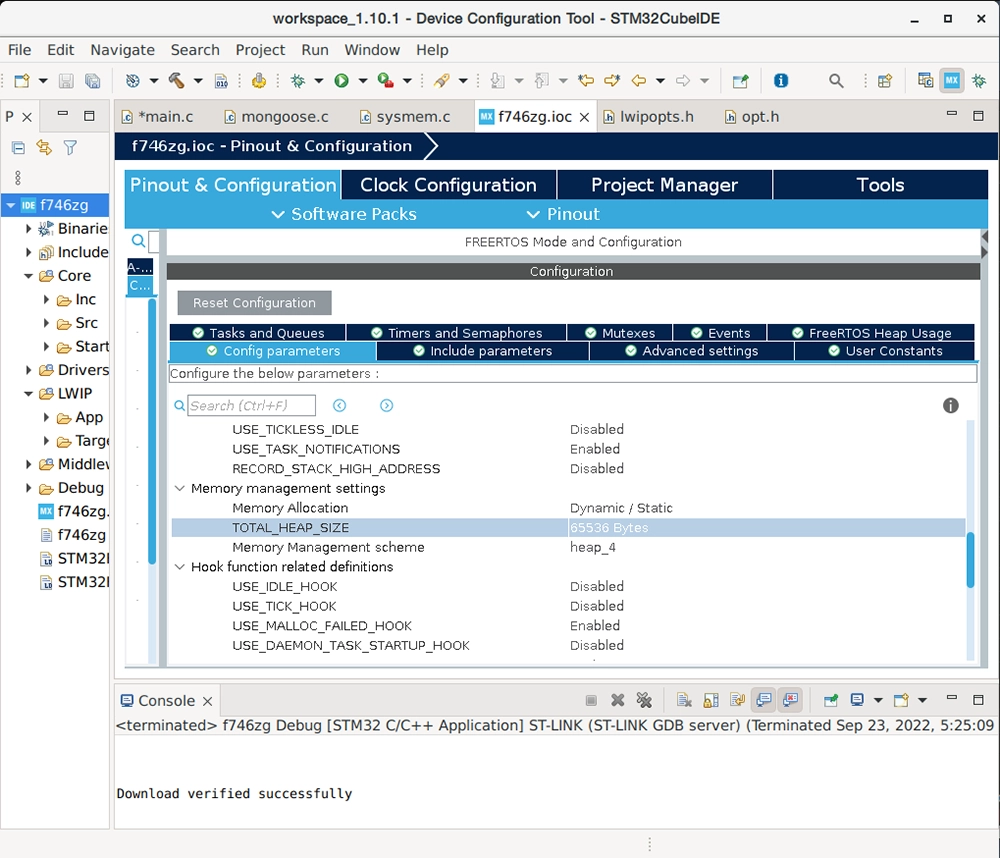
9 Configure FreeRTOS heap
Task Memory allocation defaults to dynamic. This means that memory for the stack of each new task, will be allocated from FreeRTOS heap. To work with applications requiring a high stack size, FreeRTOS heap size must be increased. We'll go ahead and set it at 64KB:
10. Simple web server
Let's modify Core/Src/main.c to add a very simple web server; it will just respond with "ok" to any URI you request.
- Let's first add the HTTP event handler, this function will be called when the event manager processes an HTTP message:
static void fn(struct mg_connection *c, int ev, void *ev_data) {
  if (ev == MG_EV_HTTP_MSG) mg_http_reply(c, 200, "", "ok\n");
}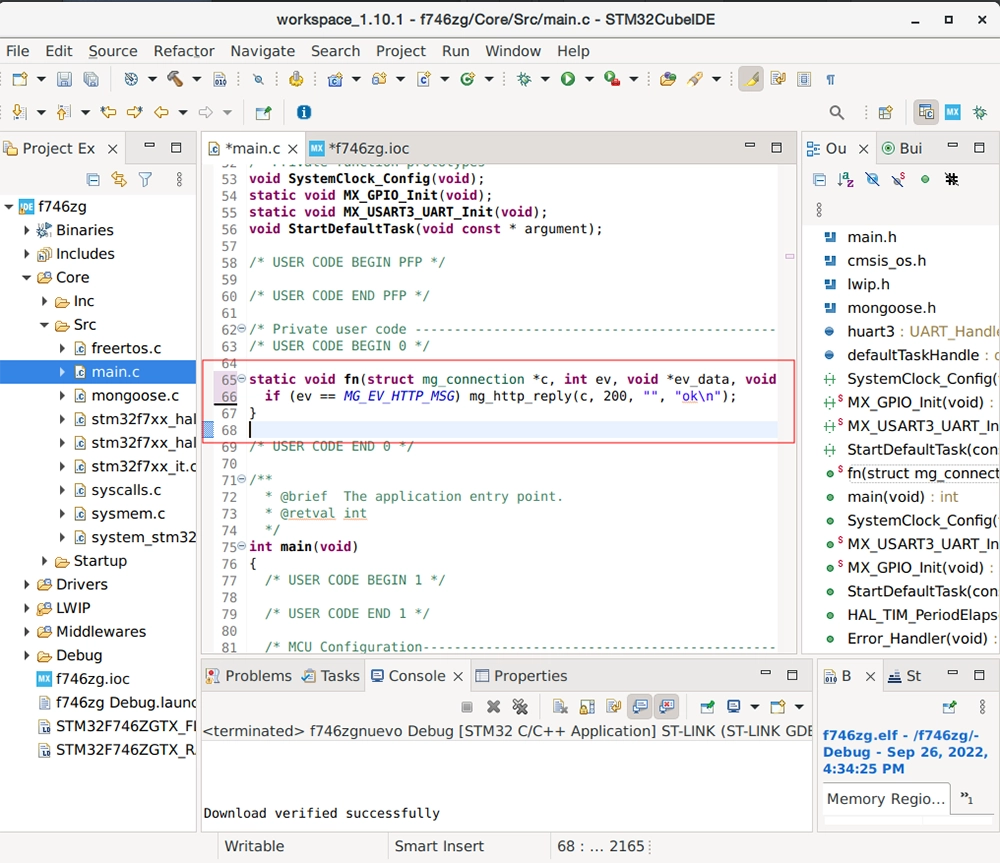
- Finally, also in
Core/Src/main.cbut inside the StartDefaultTask() function, we'll add an HTTP listener on any address. We do this after the event manager initialization and of course before the infinite loop. Passing a pointer to the former functionfnas a parameter, we instruct the event manager to call this event handler for that:mg_http_listen(&mgr, "http://0.0.0.0", fn, &mgr);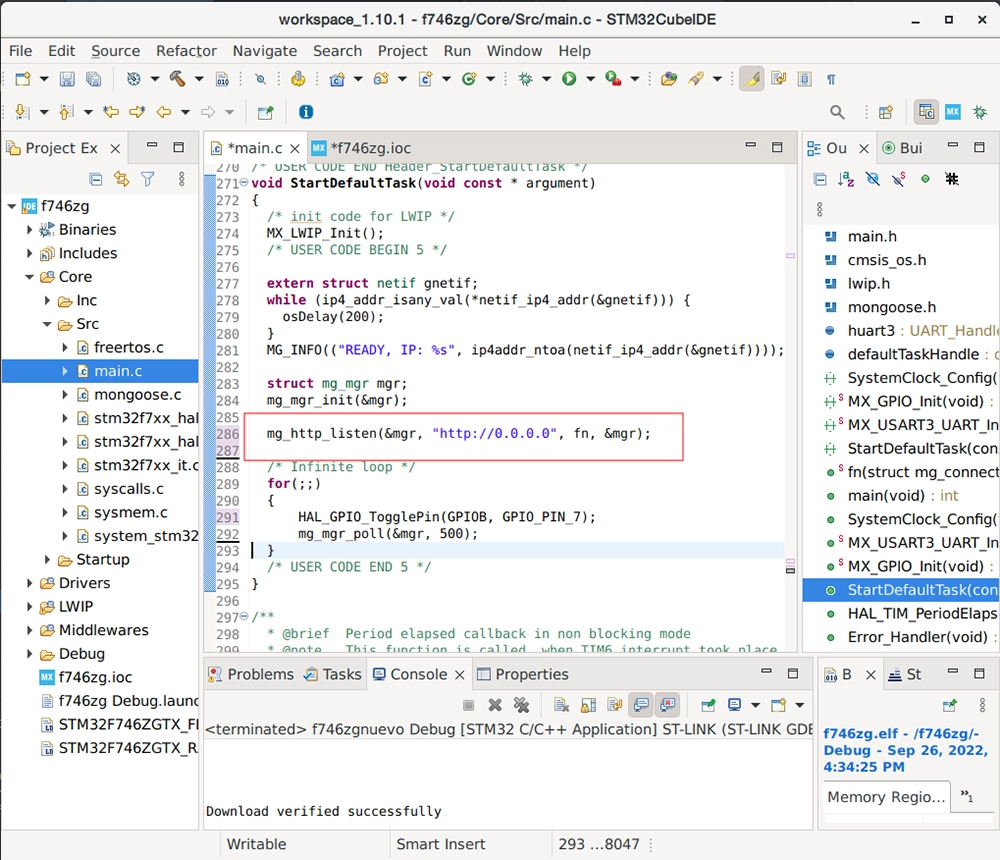
- Now go to the Tasks and Queues section and set the stack size for the only task (defaultTask) to 512 words; even though this is a very simple example, Mongoose uses a large stack:
- Now click on the green arrow icon to build the project and flash your board
- Once the DHCP server in your network assigns an address to your board, you'll see it in the log; it should be the same as before, anyway.
- Point your browser to
http://IP_ADDRESS, whereIP_ADDRESSis the board's IP address; you'll see the "ok" message
This is of course a very simple and limited example, but is also the cornerstone on which to build a RESTful server.
11. Full device dashboard
Let's add a more advanced Web UI to our web server, a full device dashboard functionality
- You can download net.c, net.h and packed_fs.c with your browser; then drag and drop them to
Core/Src/andCore/Inc/respectively for source (.c) and header (.h) files. - You can also create new files, name them net.c, net.h and packed_fs.c, and paste contents there, as we did in step 8
- The file net.c contains all the event handler functions to provide the necessary functionality; while packed_fs.c contains an embedded filesystem holding all the UI static files
- Now we need to tell Mongoose to include code for handling this packed embedded filesystem. This is done by setting the macro
MG_ENABLE_PACKED_FS=1. - Now, let's include net.h so we can call the device dashboard functions. Let's add it just below where we included mongoose.h in step 8. The device dashboard code defaults to using port 8000, to be able to listen at port 80 we need to redefine the
HTTP_URLmacro; let's add a new preprocessor symbol:HTTP_URL="http://0.0.0.0/"
- Since we'll be using several connections simultaneously, we need to tell lwIP so. Even though we are using the socket interface, internally in lwIP it uses a decoupling API called netconn, so we'll set the number of allowed connections high enough; let's also set
MEMP_NUM_NETCONN=10in the preprocessor symbols: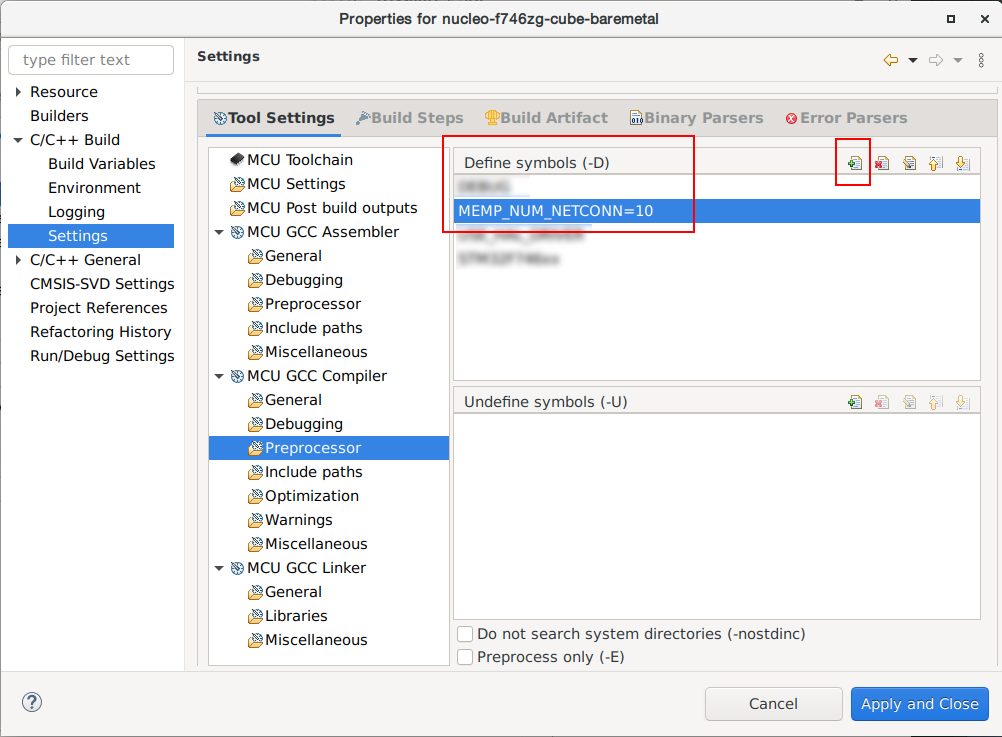
- Finally, in our main() function, we'll remove the HTTP listener and call the device dashboard init function, that carries all needed initializations:
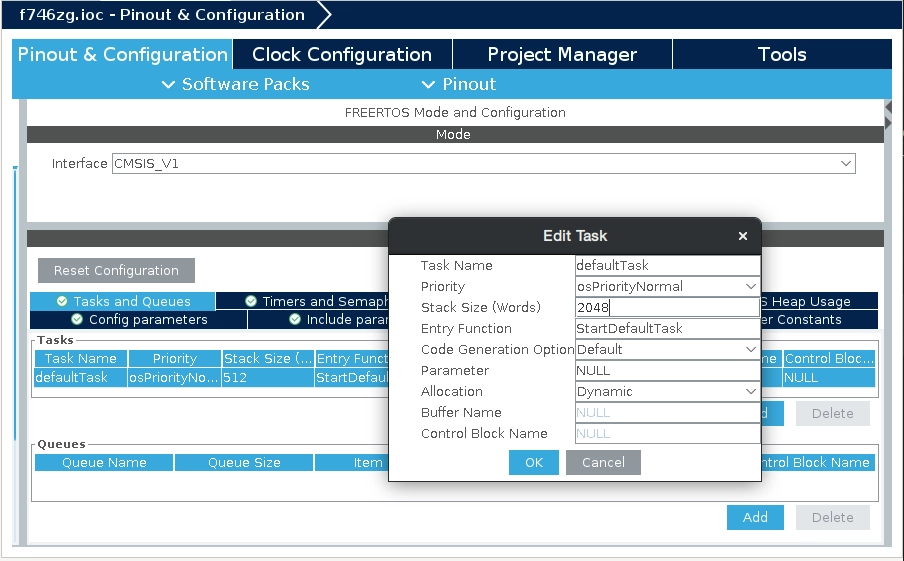
On the Nucleo-H743ZI2 board, the LED is connected to GPIO PE1.web_init(&mgr); /* Infinite loop */ for(;;) { HAL_GPIO_TogglePin(GPIOB, GPIO_PIN_7); mg_mgr_poll(&mgr, 500); } - Before we can run this successfully, we need to increase the stack size as this is a more complex task. Go to the Tasks and Queues section and set the stack size for the only task (defaultTask) to 2048 words:
- Now click on the green arrow icon to build the project and flash your board
- Once the DHCP server in your network assigns an address to your board, you'll see it in the log; it should be the same as before, anyway.
- Point your browser to
http://IP_ADDRESS, whereIP_ADDRESSis the board's IP address; you should see a login screen.
From here on, if you want to try the dashboard features please go to the device dashboard tutorial and follow some of the steps depicted there.
We didn't change any other default lwIP parameters, for serious work and performance, a tuning operation might be needed.