


MQTT Dashboard
Overview
This tutorial shows an example of how to build an MQTT dashboard, what can be very useful to manage remote devices.
The concept is to decouple the user interface (UI) from the device. The UI runs on a web browser and interacts with the device through an MQTT broker.

There is a root topic shared by everyone. Each device connects to the broker via MQTT and publishes its status on a subtopic including its device id. A dashboard (a web browser) connects to the broker using MQTT over WebSocket and subscribes to the root topic, getting all status messages published by all devices. Clients then know all devices and whether they are online or not.
When a user wants to operate on a device, chooses one from the list. The dashboard can then send commands to the device on a subtopic, and receive responses on another subtopic.
Topic structure
root_topic/device_id/status- each device publishes its status hereroot_topic/device_id/rx- clients publish commands for a device in this topicroot_topic/device_id/tx- each device responds to received commands here
RPC API
MQTT messages are JSON RPC messages. The basic API for this example is the following:
config.set- control the device, change its configuration (LED, brightness, etc)device.reset- restart the device, mainly used after firmware update
Then, the firmware update section uses additional methods; these are described in the firmware update tutorial
Build and try
Follow the Build Tools tutorial to setup your development environment.
Start a terminal in the project directory; if you've not already done so, clone the Mongoose Library repo
git clone https://github.com/cesanta/mongooseBuild the dashboard, this will also start Mongoose to serve it:
cd mongoose/tutorials/mqtt/mqtt-dashboard/dashboard
make clean all
...
1778e85b 2 net.c:206:fn                 1 CONNECTED to mqtt://broker.hivemq.com:1883
1778e85b 2 net.c:118:subscribe          1 SUBSCRIBED to topic_mg_device/2tyInbE5q/rx
1778e85b 3 mqtt.c:328:mg_mqtt_pub       1 [topic_mg_device/2tyInbE5q/status] -> [{"method":"status.notify","params":{"status":"online","led_status":false,"led_pin":0,"brightness":0,"log_level":3,"crnt_fw":{"status":0,"crc32":"0","size":0,"timestamp":0},"prev_fw":{"status":0,"crc32":"0","size":0,"timestamp":0}}}]
1778e85b 2 net.c:78:publish_status      1 PUBLISHED {"method":"status.notify","params":{"status":"online","led_status":false,"led_pin":0,"brightness":0,"log_level":3,"crnt_fw":{"status":0,"crc32":"0","size":0,"timestamp":0},"prev_fw":{"status":0,"crc32":"0","size":0,"timestamp":0}}} -> topic_mg_device/2tyInbE5q/status
17
Start a second terminal in the project directory and build the device, this will also start it:
cd mongoose/tutorials/mqtt/mqtt-dashboard/device
make clean all
Start your browser on
http://localhost:8000, the main page is loaded: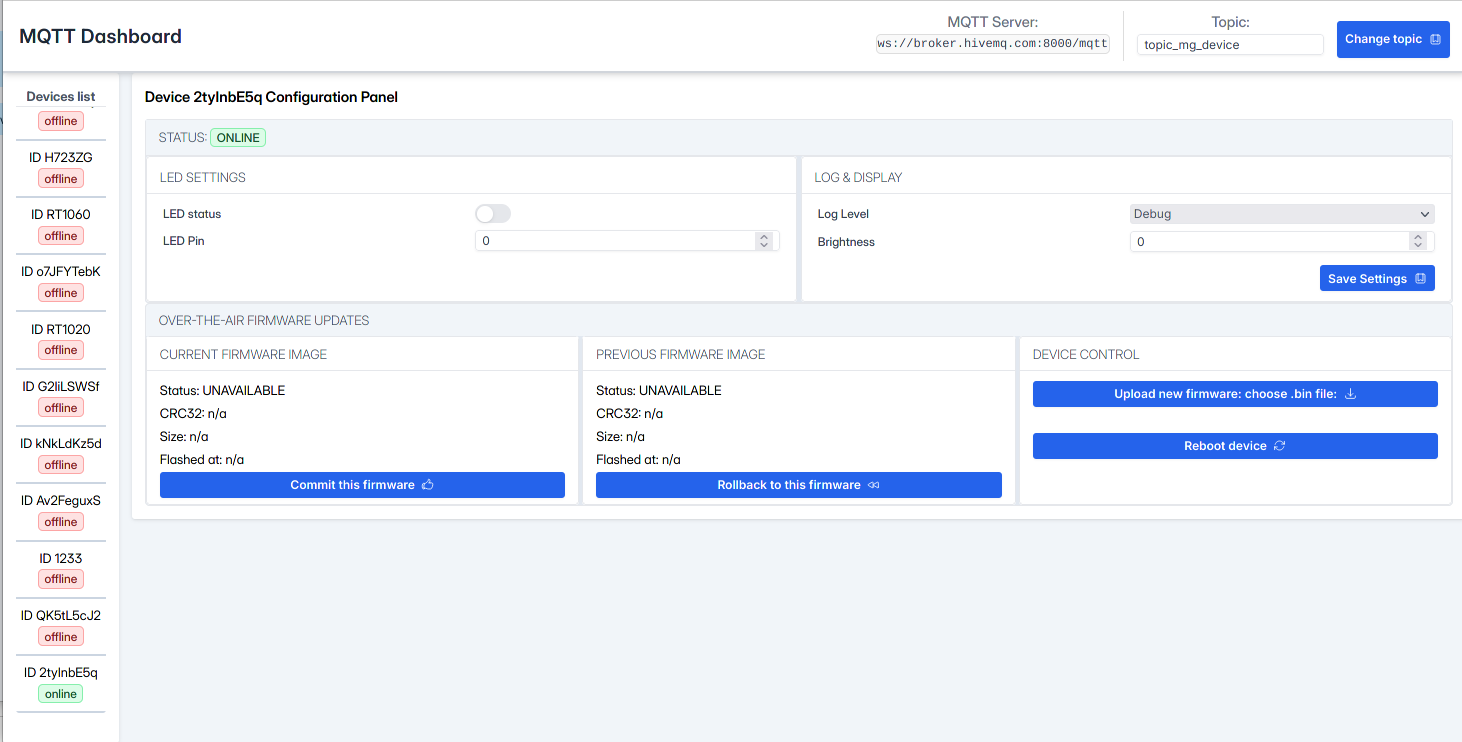
What you see there has been populated with the retained messages the broker publishes to the dashboard when it connects. Each device, when it connects, handles a last-will status message indicating it is offline, then publishes an online status message. Should a device go offline, the broker will publish its last-will message. Hence, when a dashboard connects, it gets all status messages retained, from all devices that once published a retained message in the root_topic tree.
We can simulate that manually by connecting to the broker with an MQTT or MQTT over WS client, for example:
mosquitto_sub -v -h  broker.hivemq.com -p 1883 -t topic_mg_device/#
topic_mg_device/WBiGPTLSB/status {"method":"status.notify","params":{"status":"offline"}}
...
topic_mg_device/2tyInbE5q/status {"method":"status.notify","params":{"status":"online"}}
...
topic_mg_device/QK5tL5cJ2/status {"method":"status.notify","params":{"status":"offline"}}
Selecting a device in the menu on the left, you'll open its status and control screen. Changing a parameter and pressing "Save Settings" will publish a message on the corresponding device
rxtopic. The broker will then publish that message to the device, that will process it and respond in itstxtopic, probably followed by a new status notification in itsstatustopic. The broker will then publish those messages to the clients.We can simulate that manually by connecting to the broker with an MQTT or MQTT over WS client, for example:
mosquitto_sub -v -h  broker.hivemq.com -p 1883 -t topic_mg_device/#
...
topic_mg_device/2tyInbE5q/rx {"method":"config.set","id":"rle42tlds7b","params":{"led_status":true,"led_pin":0,"brightness":0,"log_level":3,"crnt_fw":{"status":0,"crc32":"0","size":0,"timestamp":0},"prev_fw":{"status":0,"crc32":"0","size":0,"timestamp":0}}}
topic_mg_device/2tyInbE5q/tx {"id":"rle42tlds7b","result":"ok"}
topic_mg_device/2tyInbE5q/status {"method":"status.notify","params":{"status":"online","led_status":true,"led_pin":0,"brightness":0,"log_level":3,"crnt_fw":{"status":0,"crc32":"0","size":0,"timestamp":0},"prev_fw":{"status":0,"crc32":"0","size":0,"timestamp":0}}}
The
idfield is used to correlate responses to requests. This simple method can handle a fair quantity of clients as the probability of having a repeated id is very low. For large networks, other more involved strategies exist.The OTA features are described in a separate tutorial
Dashboard implementation
The UI is developed using the Preact framework, an alternative to React with the same modern API and a smaller footprint, ideal to fit on small devices with limited room for flash memory. Once served via the HTTP server, it will run on the browser; it can be served by any web server, including of course Mongoose, so it can actually be served by a small embedded device, a Raspberry Pi, etc.
For more information on building Web User interfaces, check our set of respective tutorials.
The Makefile in this example builds the UI and the Mongoose http-server example, then starts the server on port 8000
Device implementation
Let's now dive into the internals of how to build a headless device like this one.
MQTT message handling
All MQTT events are handled by this event handler function:
When the connection to the broker is established, we receive an
MG_EV_MQTT_OPENevent, then we:Subscribe to the receive topic:
Send a status notification, telling the world we are online:
To craft these JSON messages, we take advantage of the function mg_mprintf(). It is similar to printf(), but it prints into an allocated memory buffer that the caller must free by calling
mg_free(). Here we use a convenient extension to the syntax.- The specifier m is used to call a function, passing it the remaining parameter list, this also double-quotes what it prints. This function must return the number of bytes it has printed. Here we use it to print JSON-escaped strings by calling mg_print_esc() through the macro
MG_ESC().
Using a function call inside the print function allows us not only to have a clean code showing the message being sent, and handle the details of how much data is sent on a different function, but also set aside the hassle of determining how much memory allocate for that task, thing that
mg_mprintf()handles under the hood for us.The function being called will receive an output function pointer and its parameter, plus a variable argument list containing the remaining parameters; in our case
fw, the firmware image index.Inside this function, we'll use mg_xprintf(). It takes the very same parameters we received, prints where it has been told to do it, and returns how many bytes it printed.
The connection is established and kept open by a timer, that always checks it is up; otherwise it retries. On connection, we request the broker to send a retained last-will message on our behalf; that message contains a status notification indicating we are offline:
When an MQTT message is received from the broker on our
rxtopic (originally published by a dashboard), we get anMG_EV_MQTT_MSGevent. This means we got ourselves a JSON message to process. We'll put that inside the frame of a request structure and handle it to mg_rpc_process() to invoke the requested method. Note we pass a pointer to mg_pfn_iobuf(), a character printing function, and initialize an IO buffer (a simple data structure that inserts or deletes chunks of data at arbitrary offsets and grows/shrinks automatically) prior to handle it to the processor.Then, if there is a result, we'll publish a response in our
txtopic and also update our status
For more information on MQTT clients, check this tutorial
RPC handling
The basic RPC function for this example is the following:
The RPC processor is initialized by adding the used methods:
This is done at the web_init() function
Take a look at the JSON-RPC tutorial for details on how to use Mongoose's built-in JSON and RPC APIs.
main() and init
The main() function maintains a structure similar to that we are used to, in which we just initialize an event manager and
start the event loop.
The function web_init() takes care of initializing the necessary ids, and starts the periodic timers that will keep the MQTT connection up and running, as we've seen, and to send the necessary keepalives
Embedded device examples
The following are hardware examples that implement a remote MQTT controllable device as seen above.
| Board | Example code |
|---|---|
| Raspberry Pi Pico (USB RNDIS) | tutorials/pico-sdk/pico-rndis-device |