


Raspberry Pi Pico / XIAO RP2040
Overview
This tutorial shows how to use Mongoose Library over RNDIS through a USB connection, using its built-in TCP/IP stack, and running on a Raspberry Pi Pico board or even the tiny Seeed Studio XIAO RP2040.

Features of this implementation include:
- Uses the Raspberry Pi Pico-SDK
- Uses TinyUSB headers and sources
- Uses Mongoose's built-in TCP/IP stack
- Does NOT use an external network stack like lwIP, or RTOS like FreeRTOS
- The Web dashboard provides:
- User Authentication: login protection with multiple permission levels
- The web UI is optimised for size and for TLS usage
- Logged users can view/change device settings
- The web UI is fully embedded into the firmware binary, and does not need a filesystem to serve it, making it resilient
This example is a hardware adaptation of the Device Dashboard that can run on Mac/Linux/Windows. Mongoose Library, being cross-platform, allows to develop and run the same code on different platforms. That means: all functionality related to networking can be developed and debugged on a workstation, and then run as-is on an embedded device - and this example is a demonstration of that.
This example uses the Pico-SDK and compiles with its standard toolchain, it has the following files:
- main.c: provides the
main()entry point with hardware init and LED blinking, providing an interface with TinyUSB, initializing the network, and calling the event manager - CMakeLists.txt - A cmake file that selects the source files and compilation options
- Makefile- mainly pulls the SDK from its Github repo and calls cmake
mongoose.c,mongoose.h- Mongoose Librarynet.c,net.h- part of the device dashboard example, contains the Web functionalitypacked_fs.c- part of device dashboard example, embeds the Web UI used by the dashboard
Below is a general process outline:
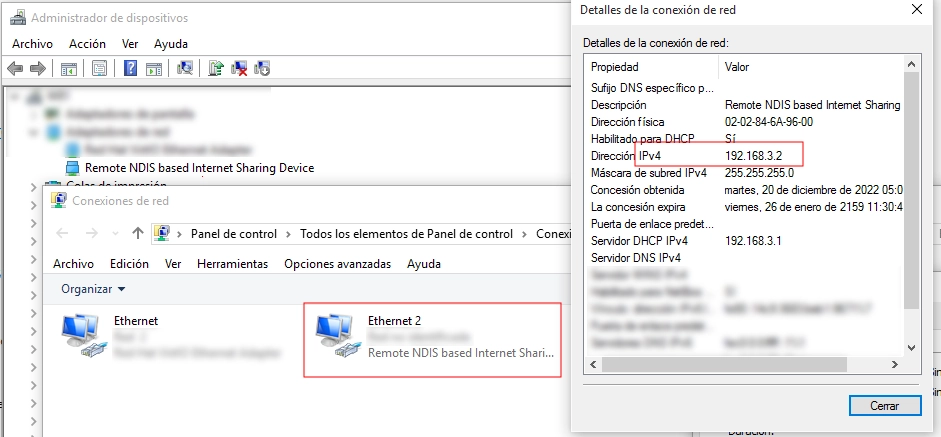
- The board IP addressing will be static:
192.168.3.1. If this conflicts with your network, change IP address and network mask inmain.c; see below - Build the example and copy it to the Pico board (see below)
- The device will reboot
- The firmware initializes the USB stack
- After initialization, the application starts Mongoose's event loop and blinks the LED
- Once the LED starts blinking, the example is ready
- The board will enumerate as a composite device having a Mass-storage Device Class (MSC) and either a USB Communication Device Class (CDC) Ethernet Control Model (ECM) device, or a Remote Network Driver Interface Specification (RNDIS) device. This allows us to work with different host operating systems (Mac users: see below)
- The host will add a new mass-storage device and will mount it.
- The host will then add a new networking interface and will ask for an IP address. Our device will respond assigning it an address corresponding to its own address +1:
192.168.3.2 - Double click on the new mounted disk, named
Mongoose, you'll see a singleINDEX.HTMfile. Double click on it, your browser should open and you should see a login screen.- Alternatively, open your web browser and manually connect to the board IP address (
192.168.3.1)
- Alternatively, open your web browser and manually connect to the board IP address (
Build and run
Follow the Build Tools tutorial to setup your development environment.
Start a terminal in the project directory; clone the Mongoose Library repo, and go to this project directory:
git clone https://github.com/cesanta/mongoose
cd mongoose/examples/pico-sdk/pico-rndis-dashboard
If you are running on a Mac, please set
DUAL_CONFIG=1inCMakeLists.txtbefore building; this enables CDC-ECM. Please notice that Windows may not recognize the mass-storage device in that case.Now run the
make buildcommand:make buildOnce the build succeeds, boot your Pico in USB Mass Storage Mode by holding down the
BOOTSELbutton while you plug it into the USB port. Once it is connected, release theBOOTSELbutton. It should automatically mount as a new USB disk in your machine. Now either manually copy or drag and drop the generatedbuild/firmware.uf2file into this new USB disk device.The Pico will flash this code and reboot, unmounting this disk and running the flashed code.
- On Windows:
- On a Linux host, you'll see something like this in the system log (
dmesg -w):
In case the drive doesn't automatically mount, in this particular case sde is the disk so sde1 will be the partition to mount[82973.117328] usb 5-4: New USB device strings: Mfr=1, Product=2, SerialNumber=3 [82973.117334] usb 5-4: Product: TinyUSB Device [82973.117338] usb 5-4: Manufacturer: TinyUSB [82973.117343] usb 5-4: SerialNumber: 123456 [82973.137897] rndis_host 5-4:1.0 usb0: register 'rndis_host' at usb-0000:00:13.0-4, RNDIS device, 3a:12:30:97:00:ae [82973.138450] usb-storage 5-4:1.2: USB Mass Storage device detected [82973.139368] scsi host32: usb-storage 5-4:1.2 [82974.150386] scsi 32:0:0:0: Direct-Access TinyUSB Mass Storage 1.0 PQ: 0 ANSI: 2 [82974.151388] sd 32:0:0:0: Attached scsi generic sg7 type 0 [82974.156305] sd 32:0:0:0: [sde] 16 512-byte logical blocks: (8.19 kB/8.00 KiB) [82974.163317] sd 32:0:0:0: [sde] Write Protect is on [82974.163322] sd 32:0:0:0: [sde] Mode Sense: 03 00 80 00 [82974.170312] sd 32:0:0:0: [sde] No Caching mode page found [82974.170324] sd 32:0:0:0: [sde] Assuming drive cache: write through [82974.207313] sde: [82974.233305] sd 32:0:0:0: [sde] Attached SCSI removable disk - If you enabled the dual config option, the device will present both an MSC + RNDIS and an MSC + CDC-ECM configuration. Please notice that Windows may not recognize the mass-storage device in this case.
- On MacOS, CDC-ECM will be picked:
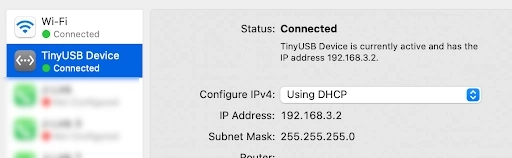
- On a Linux host, you may see this extra line in the system log (
dmesg -w):
[30923.230334] usbcore: registered new interface driver cdc_etherThough both configurations will be detected, likely RNDIS will be picked over CDC-ECM
- On MacOS, CDC-ECM will be picked:
- On Windows:
Now open the new drive, named
Mongoose, and double click on itsINDEX.HTMfile; your browser should open and you should see a login screen. Otherwise, start a browser on192.168.3.1NOTE: USB stdio in the Pico-SDK is done in background with TinyUSB and an interrupt to hide it from the user and periodically call
tusb_task(). When we use TinyUSB, that code is removed from the compilation list; so this example uses UART stdio (UART 0) to keep things simple and focused on the RNDIS example. If you want to see the console output, connect an USB-to-UART or a low-voltage-TTL-to-RS-232 adapter to GPIO0From here on, if you want to try the dashboard features please go to the device dashboard tutorial and follow some of the steps depicted there.
Compilation options
Network operations need a time base to calculate timeouts; this, as well as random number generation, will be provided by the SDK, and Mongoose needs to know how to link to them. We define these and other compilation options in mongoose_config.h
MG_ARCH = MG_ARCH_RP2040- configures Mongoose to work with the RP2040 SDKMG_ENABLE_TCPIP = 1- enables the built-in TCP/IP stack
main.c overview
This example can be divided in the following blocks:
- TinyUSB integration for this environment
- Initialize the microcontroller for this particular board
- Initialize the USB controller and stack
- Initialize Mongoose
- Initialize the networking stack
- Run Mongoose and TinyUSB
- Under the hood: interfacing Mongoose to TinyUSB, driver internals
TinyUSB integration
In the Makefile, we clone the Pico-SDK repository at a stable branch, and TinyUSB is a submodule in it; in fact, it has been already integrated, though not for this particular application.
Then we set the proper paths for include files and required code:
pico-sdk/lib/tinyusb/lib/networking: headers and code. We cherry picked the necessary files from this subtree, seeCMakeLists.txtmsc_disk.c: definitions and code to support the mass-storage device, including the disk imageusb_descriptors.c: definitions and code to present the required descriptors for the classes in usetusb_config.h: enable the required classes, the rest of the job has been done inside the SDK
USB controller interrupts are already routed to the TinyUSB handler by the SDK. But, as we'll see below, as this is bare-metal code, we'll periodically call its main handler
Then TinyUSB will call us back when it has finished initializing the network, when it has received a frame, and when it can send a frame:
void tud_network_init_cb(void);
bool tud_network_recv_cb(const uint8_t *buf, uint16_t len);
uint16_t tud_network_xmit_cb(uint8_t *dst, void *ref, uint16_t arg);
We will ask TinyUSB if we can transmit and to do it, using these function calls:
  tud_network_can_xmit(len);
  tud_network_xmit(buf, len);
MCU and board initialization
We call SDK functions to initialize the MCU, stdio, and those peripherals we are going to use:
USB controller and stack initialization
The USB controller will be initialized by the SDK. We just need to call the TinyUSB initialization function:
Mongoose initialization
Then we initialize Mongoose, this is no different from what we always do in any example.
There is also a timer that we use to blink the LED
For more information on timers, check the timers tutorial.
TCP/IP initialization
The built-in TCP/IP stack has to be enabled to be compiled in, and so Mongoose will work in association with it. This is done in the CMakeLists.txt file by defining MG_ENABLE_TCPIP=1.
Then this networking stack has to be configured and initialized. This is done by calling mg_tcpip_init() and passing it a pointer to a struct mg_tcpip_if. Inside this structure:
- have pointers to a
struct mg_tcpip_driverand any extra data that it could need. This structure is usually provided by the driver and we just reference it; in this case, we'll see the internals later - As we use a static IP address, specify
ipandmaskin network order. We don't provide a gateway as this interface is intended to only connect our device and the host - Since we need to provide an IP address to the host, we enable our internal DHCP server.
Note that, we also need to specify a unique MAC address. For this example we chose a fancy unicast locally administered address.
The USB controller will be handled by TinyUSB, providing callback functions to be called when it has received a frame; then we will push it to a queue in Mongoose, from where it will pick it up later.
Run Mongoose
Then we run Mongoose. This is no different from what we always do in any example, though note that it should be run after network initialization. The logic is standard: initialize the event manager (as we already did), start a listener, and fall into an infinite event loop:
IThe listener is started by web_init(), the device dashboard initialization function. The URL is configured by the macro HTTP_URL, which we set in CMakeLists.txt.
We have covered those aspects that are specific to the RP2040 implementation, for the details on the application and the UI, please see the device dashboard tutorial.
Under the hood
This subsection is only for those with enough curiosity or interested in writing their own driver for Mongoose. Feel free to skip ahead if this does not apply to you.
The struct mg_tcpip_driver provides pointers to driver functionality. tx points to a function to be called when Mongoose needs to send a frame, and poll points to a function calling TinyUSB's handler and returning the state of the interface:
To drive TinyUSB and know whether the interface is up or not, Mongoose calls the function we configured, and we ask TinyUSB:
To send a frame, Mongoose calls the function we configured and we need to handle it to TinyUSB. If it can't be sent, we call its handler until it allows us to place a transmit request.
Due to the nature of USB and the way TinyUSB is written, the former is a blocking request for transmission; we'll be called back and instructed where to copy the data to be sent:
If a driver has to be polled for data, then it will also implement an rx() function. Otherwise, if received data is asynchronous to Mongoose, it provides an internal lock-free queue and we can take advantage of it. The user (as in this example) may set the queue length to the required size, otherwise a default will be used and Mongoose will allocate the necessary memory for us.
The USB controller will be handled by TinyUSB, providing callback functions to be called when it has received a frame; then we will push it to the queue by calling mg_tcpip_qwrite(). The TCP/IP stack will run on the next call to the event manager and then pop the frame from the queue to be processed.
If you want to use multi-threading, just follow Mongoose documentation as usual and call all mg_* API functions from the same RTOS task where Mongoose is running. The function mg_tcpip_qwrite(), however, can be called from any other context, so you could run TinyUSB in its own RTOS task if properly configured.