


Keil MDK, step by step for STM32
Overview
This tutorial is a step-by-step guide on how to build a Mongoose-based Web UI dashboard on NUCLEO development boards using the ARM Keil MDK development environment. We provide instructions for NUCLEO-F746ZG, NUCLEO-F429ZI, and NUCLEO-H743ZI2.
We'll start from scratch, first creating a new Keil MDK project and then following these steps:
- Blink an LED
- Send text through a USART
- Redirect printf() output to a USART
- Change the system clock to the highest frequency
- Enable the Ethernet MAC Controller
- Integrate Mongoose Library into our project
- Implement a simple web server
- Implement the full device dashboard
- Follow the Build Tools tutorial to setup your development environment.
Create a new Keil MDK project in μVision5
If this is your first time, we'll be using STM32CubeMX for device configuration, so you should also install it.
Start μVision and create a new project
- To be able to create a project for a specific device, we need to have the proper device family pack to support it, so let's open the Pack Installer

- Install the device family pack for your device, in our case:
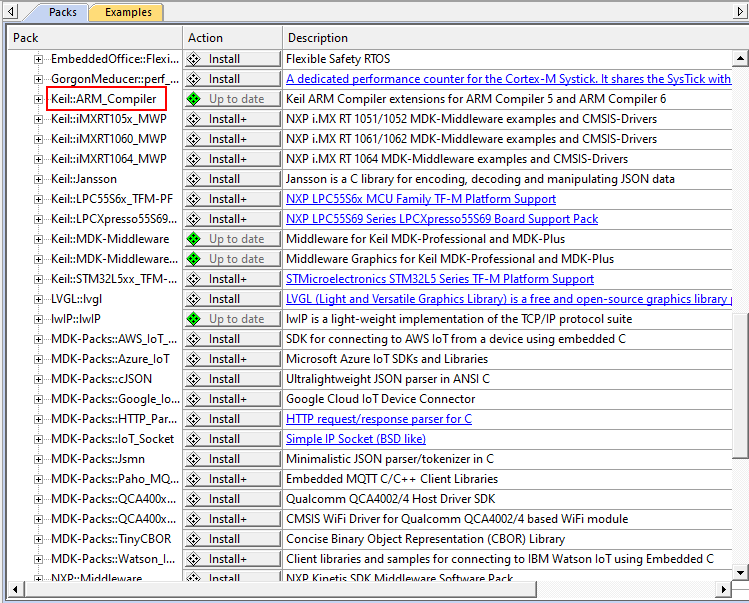
Keil::STM32F7xx_DFPBoard Device (Rev) Device Family Pack NUCLEO-F429ZI STM32F429ZIT6 Keil::STM32F4xx_DFP NUCLEO-F746ZG STM32F746ZGT6 Keil::STM32F7xx_DFP NUCLEO-H743ZI STM32H743ZIT6 (Y) Keil::STM32H7xx_DFP NUCLEO-H743ZI2 STM32H743ZIT6 (V) Keil::STM32H7xx_DFP 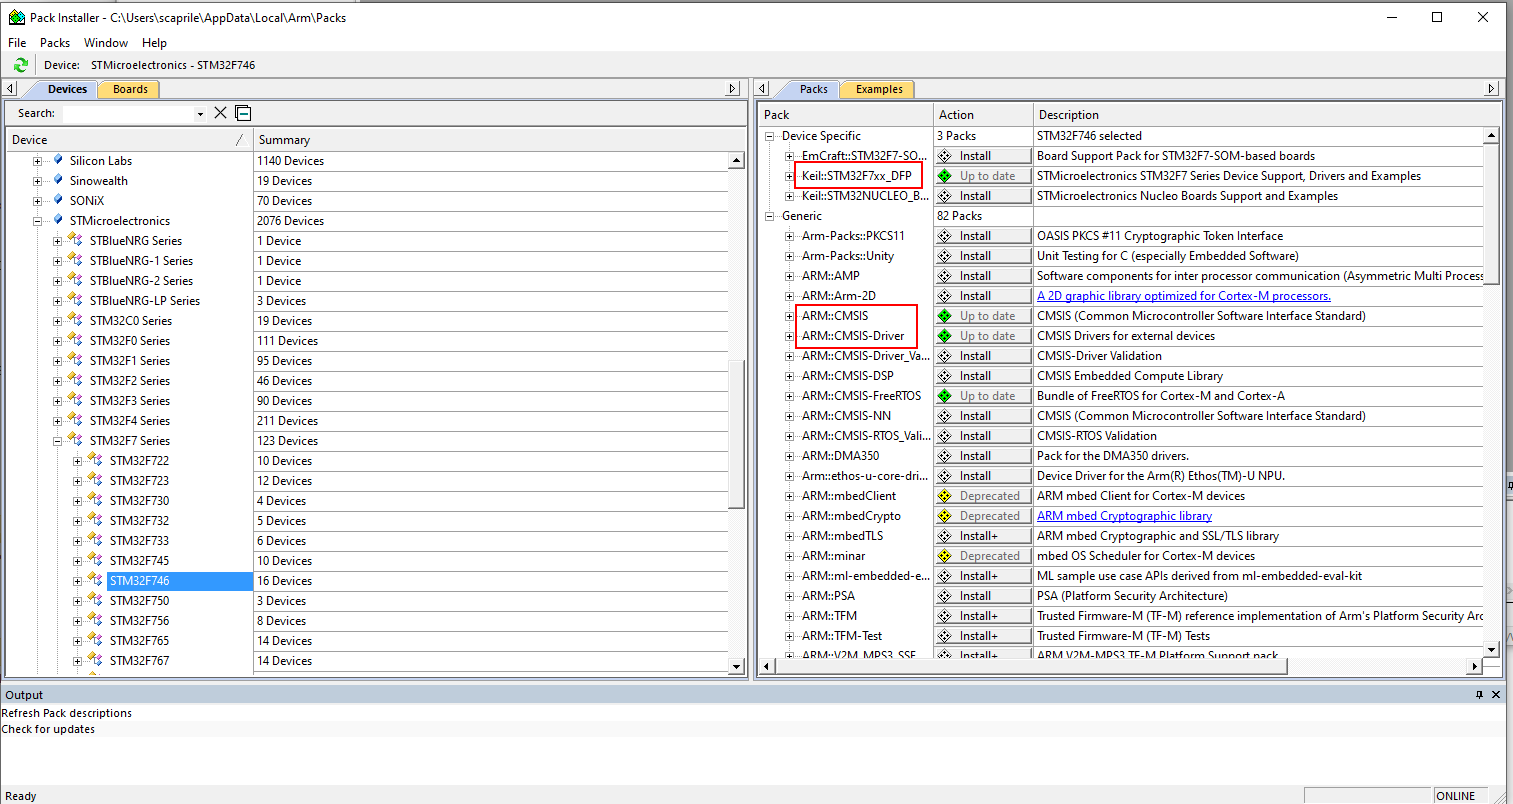 - This is also a good moment to install any other Software Packs we will need for this project, like `ARM::CMSIS` and `Keil::ARM_Compiler` or those we know we might need in the future, like `ARM::CMSIS-Driver`, an RTOS, or a networking stack.
- Now follow the menu
Project -> New uVision Project..., create a directory with the application name, open it, and assign a project name - The target selection window opens, select the proper device for your board (see table above), in our case
STM32F746ZGTx
- Now the Run-Time Environment management window opens, select
CMSIS -> Core,Device -> Startup,Device -> STM32Cube Framework (API) -> STM32CubeMXandDevice -> STM32Cube HAL -> GPIO; then solve dependencies and some more pieces of the HAL will be picked up for you
- That green play icon to the right of
STM32CubeMXwill allow us to run that application later to reconfigure our device for this project. Now, once we confirm our selection, a requester asking to start STM32CubeMX will open.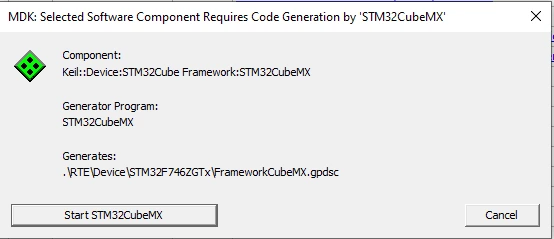
- Configure your device in
STM32CubeMX- Say "NO" to any suggestions for convenience on setting peripherals we are not going to use, this just adds to the amount of source (and binary) code generated and shifts our focus.
- Configure desired pins and peripherals. As there is no option to configure for a board, follow the respective sections in this Cube step by step tutorial to configure for a device; STM32CubeMX is a generic stand alone version of the Device Configuration tool in STM32CubeIDE. We'll address this step by step below, anyway.
- Configure the
STM32CubeMXproject options for Keil. You'll find screen captures and details in this Keil tutorial; we'll go through the main steps below:- When using an RTOS, make sure you disable code generation for those IRQ handlers the OS will use. The most common are the SWI, PendSV and SysTick handlers, so uncheck
System service call via SWI instruction,Pendable request for system serviceandTime base: System tick timerin thePinout & Configurationtab,System Coresection,NVIC -> Code generation. The HAL will need a timebase, so either solve this with code or use a different timer for it - Select the
Project Managertab, and in theProjectsection markDo not generate the main(), this way auto-generated code will not interfere with the way we want to write ourmain()function and handle ourmain.cfile. There will be twomain.cfiles, though, but μVision will rename the one generated by the Cube tool. Leave the rest of the options alone, we don't need anything of this and the Toolchain / IDE option, as you can see, has already been set forMDK-ARM - Now reveal the
Code Generatorsection and in "STM32Cube MCU packages and embedded software packs" selectAdd necessary library files as reference in the toolchain project configuration file. This allows the Keil MDK to know what libraries we need, and pick them up from its own packages; we'll work with those versions of the Cube HAL that have been selected by Keil for us. VerifyKeep User Code when re-generatingis marked in "Generated files" - Click on
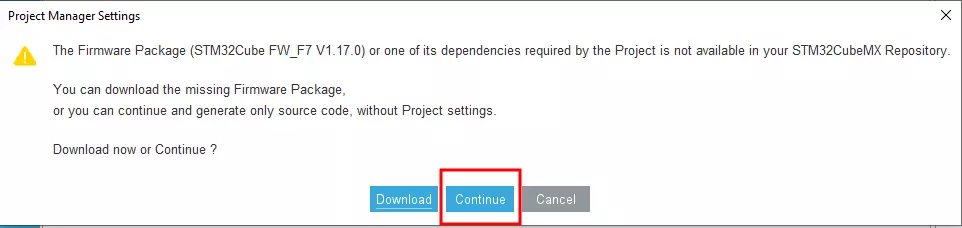
GENERATE CODE. There is no need to download any Firmware Package, as we are not going to use it, we'll use Keil packs, so save valuable time and some hard disk space and answerNoto this requester, andContinue.
- Once the project generation has finished,
Closeand go back to μVision. You can keep STM32CubeMX open if you want, as we will be changing pin configurations in this tutorial. If you close it, you can open it back from the Run-Time Environment management window, clicking on the green play icon to the right ofSTM32CubeMXas we've said above.
- When using an RTOS, make sure you disable code generation for those IRQ handlers the OS will use. The most common are the SWI, PendSV and SysTick handlers, so uncheck
- On μVision, click
OKin the Run-Time Environment management window. You'll see a requester asking if you want to import the changes to your project, clickYesand we're done, our project is ready (and empty)
- To be able to create a project for a specific device, we need to have the proper device family pack to support it, so let's open the Pack Installer
Configure the project with the most common options we'll use in Mongoose; make sure
Target 1is selected in the project window and follow the menu toProject -> Options for Target 'Target 1'- In the
Targettab, selectXtal (MHz): 16(64 for the H7); and, In the Code Generation section, selectARM Compiler -> Use default compiler version 6. This is the newer Clang-based version. You may also use version 5 in C99 mode but we don't support that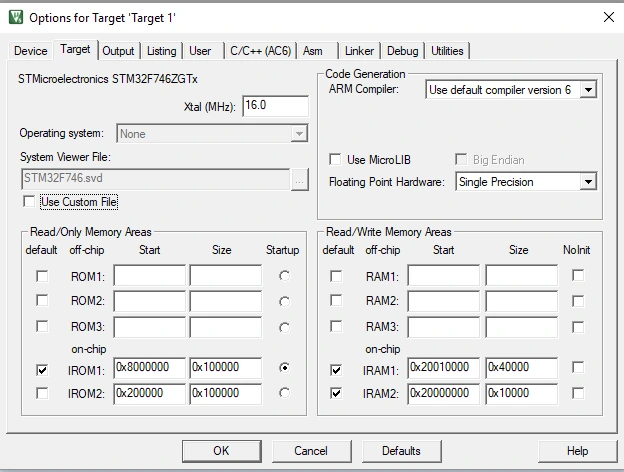
- In the
C/C++ (AC6)tab, select as shown:Language: ARM suggests to use<default>as it provides support for the latest and greatest, but some packages might issue a warning that you need to set it to C99; the F4 HAL, for example.Optimization: -Os balancedWarnings: <unspecified>, we'll set them manuallyTurn Warnings into Errors, this is what we usually do in our MakefilesOne ELF section per functionMisc Controls: -W -Wall -Wextra -Wundef -Wshadow -Wdouble-promotion -Wno-unused-parameter -Wconversion -Wno-sign-conversion -fno-common -fdata-sections, this is also what we usually do in our Makefiles- You might need to add
-Wno-unused-parametersometimes, to disable this warning when we get it from ST HAL sources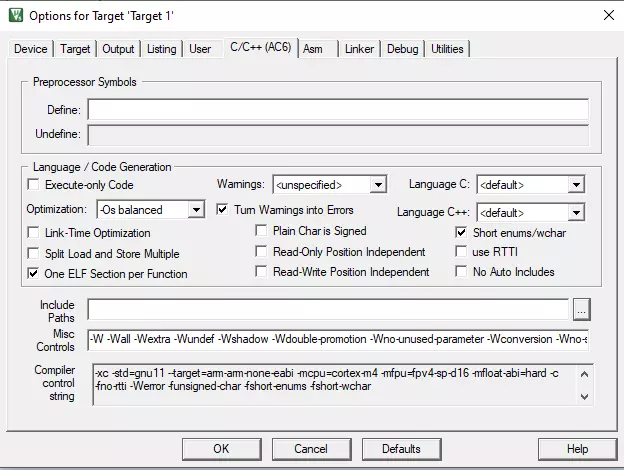
- In the
Debugtab, select theST-Link Debugger, unless of course you are using a different debug adapter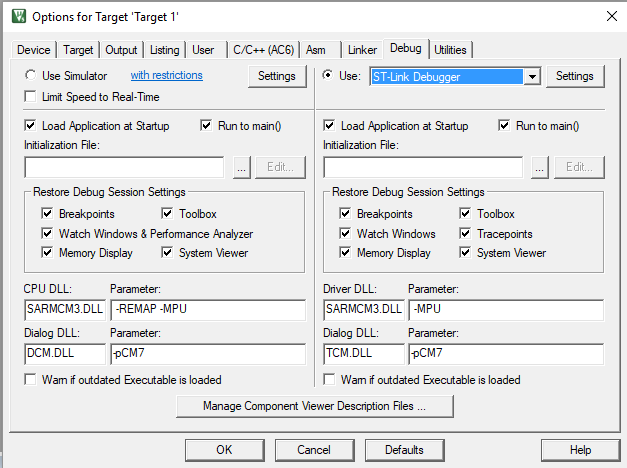
- In the
Utilitiestab, selectUse Target Driver for Flash Programmingand markUse Debug Driver, this takes care of how to flash the device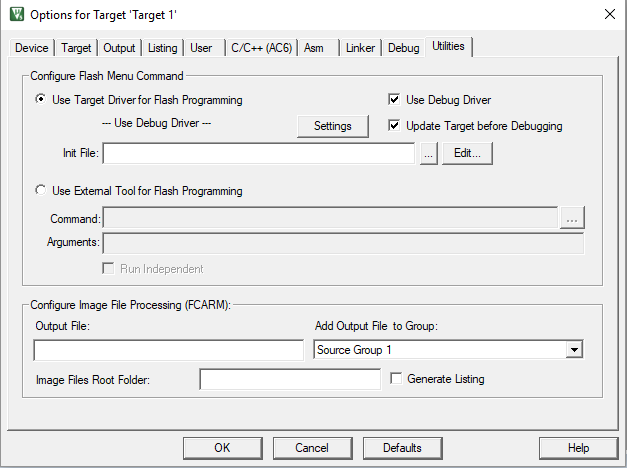
- Click
OK, we are done
- In the
Configure the amount of stack and heap. Open the file
Device/startup_stm32f746xxx.s, and at the bottom of the editor select theConfiguration Wizardtab. The file can now be edited in a friendly way. The following is a plenty-of-room configuration for devices like the ones in these Nucleo boards, for baremetal projects. ForStack ConfigurationsetStack Size 0x8000(that is 32 KB, though 8KB should be enough for this example). ForHeap ConfigurationsetHeap Size 0x20000(that is 128 KB). For RTOS projects, see how your RTOS allocates memory as it may have its own heap or use this one, and surely will provide its own stack space.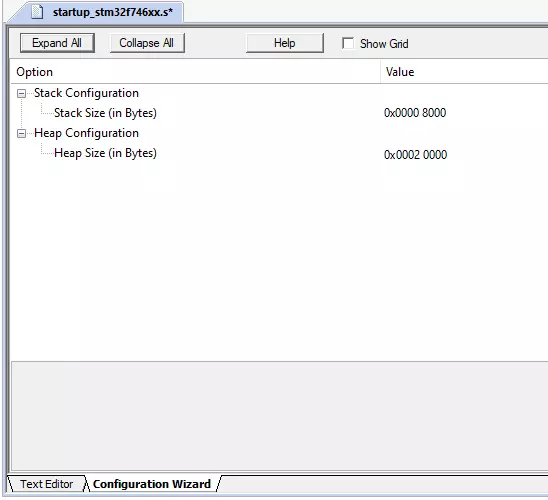
Now let's create our
main.cfile. In the Project explorer selectSource Group 1, right click and on the popup menu selectAdd New Item to Group 'Source Group 1'.... We'll create aC File (.c)namedmain.c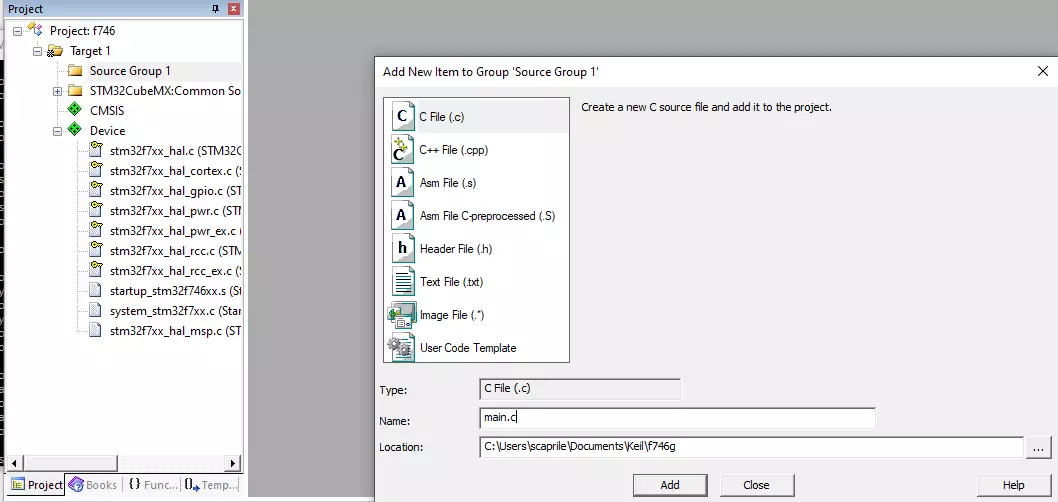
This is a complete bare minimum skeleton, we'll be adding more stuff when we need it
1. Blink the blue LED
- Let's fist configure the LED GPIO. Open the Run-Time Environment management window, click on the green play icon to the right of
STM32CubeMXto open this tool, then follow 'Step 1' in this tutorial to configure the GPIO pin. Click onGENERATE CODEand follow the same steps above to return to μVision and import the changes. - Now, STM32CubeMX generated code to initialize the GPIOs, but as we told it not to generate the main function, it will only add these functions but not call them. We can call them in our
main.cfile, for these examples it is easier to group all these calls into a single function and call this one. So, openSTM32CubeMX:Common Sources/main.cin the editor and add a functionmx_init()in USER CODE section 0 and let's group all the init function calls there:/* USER CODE BEGIN 0 */ void mx_init(void) { SystemClock_Config(); MX_GPIO_Init(); } /* USER CODE END 0 */ - Once this is done, we can write our blink code in
main.c. Using some HAL functions we'll toggle the pin and wait for 500ms inside the main loop:
Including#include "main.h" extern void mx_init(void); int main(void) { mx_init(); for (;;) { HAL_GPIO_TogglePin(GPIOB, GPIO_PIN_7); HAL_Delay(500); } }main.h, generated by Cube, we have access to all the HAL functions - Now build the project; press load, and your board will be flashed with this code. Reset the board and you'll see the blue LED start blinking

2. Send text to USART3
These boards have a built-in ST-Link debugger, which also provides a USB serial port wired to PD8 and PD9. These pins can be used by USART3.
- Let's fist configure USART3 and GPIOs. Open the Run-Time Environment management window, click on the green play icon to the right of
STM32CubeMXto open this tool, then follow 'Step 2' in this tutorial to configure USART3 and its pins. Click onGENERATE CODEand follow the same steps above to return to μVision and import the changes. - Now, STM32CubeMX generated code to initialize the USART and expanded the GPIO initialization code, open
STM32CubeMX:Common Sources/main.cin the editor and add the new initialization function tomx_init():/* USER CODE BEGIN 0 */ void mx_init(void) { SystemClock_Config(); MX_GPIO_Init(); MX_USART3_UART_Init(); } /* USER CODE END 0 */ - Now we need to add the proper libraries in our Run-Time Environment configuration; in the Run-Time Environment management window select
Device -> STM32Cube HAL -> UART(we are using a USART but with the UART driver) andDevice -> STM32Cube HAL -> DMA(the driver library uses it); should newer packages have different dependencies, solve them. - Once that is done, the default code has already included the USART setup and this defaults to using 115200 bps. let's add UART output to our code using one of the HAL functions:
extern UART_HandleTypeDef huart3; HAL_UART_Transmit(&huart3, (uint8_t *)"hi\r\n", 4, 500); - Build and flash
- With the terminal software of your choice, open the proper USB serial port at 115200 bps and you'll see the board greeting you:
hi
3. Redirect printf() to USART3
This will not only allow us to print texts in a simpler way, but also use printf() for debug output, which will enable Mongoose log output further on.
- We'll retarget stdout to the UART. First, we need to tweak our Run-Time Environment configuration, in the Run-Time Environment management window select
Compiler -> I/O -> STDOUTand change the Variant toUser. - Now we need to add the function
stdout_putchar(char)that will do the job. We usually assignsyscalls.cfor this tasks; but you can add it in main.c if you like:#include <stdlib.h> #include <string.h> #include "main.h" int stdout_putchar (int ch) { extern UART_HandleTypeDef huart3; HAL_UART_Transmit(&huart3, (const uint8_t *)&ch, 1, 100); return ch; } - Now change the UART output in
main.cto use printf():#include <stdio.h> #include "main.h" extern void mx_init(void); int main(void) { mx_init(); for (;;) { HAL_GPIO_TogglePin(GPIOB, GPIO_PIN_7); printf("hi 2\r\n"); HAL_Delay(500); } } - Build and flash
- With the terminal software of your choice, open the proper USB serial port at 115200 and you'll see the board greeting you:
hi 2
4. Change system clock frequency
- Open the Run-Time Environment management window, click on the green play icon to the right of
STM32CubeMXto open this tool, then follow 'Step 4' in this tutorial. Click onGENERATE CODEand follow the same steps above to return to μVision and import the changes. - We are already calling the clock setup function, but as we have just also enabled the RNG, let's add a call to its init function:
  /* USER CODE BEGIN 0 */
  void mx_init(void) {
    SystemClock_Config();
    MX_GPIO_Init();
    MX_USART3_UART_Init();
    MX_RNG_Init();
  }
  /* USER CODE END 0 */
5. Enable the Ethernet controller
- Open the Run-Time Environment management window, click on the green play icon to the right of
STM32CubeMXto open this tool, then follow 'Step 5' in this tutorial. In this tutorial, and in general in all our Keil projects, we'll only be using a small subset of the ETH HAL, so follow the guide to not generate the ETH IRQ Handler. - Click on
GENERATE CODEand follow the same steps above to return to μVision and import the changes. - Add a call to its init function:
  /* USER CODE BEGIN 0 */
  void mx_init(void) {
    SystemClock_Config();
    MX_GPIO_Init();
    MX_USART3_UART_Init();
    MX_RNG_Init();
    MX_ETH_Init();
  }
  /* USER CODE END 0 */
6. Integrate Mongoose
Download mongoose.h and mongoose.c with your browser; then drag and drop them to your project folder.
In the Project explorer, select
Source Group 1, right click and on the popup menu selectAdd Existing Files to Group 'Source Group 1'.... Select and add mongoose.h and mongoose.cNow
#include "mongoose.h"from main.c so we can call Mongoose API functionsNow we need to tell Mongoose in which architecture it is running. This is done by defining the macro
MG_ARCH; and when this symbol is not defined and there is no other clue, Mongoose will default to try to includemongoose_config.h. Let's create this file and add this content to it:#pragma once #define MG_ARCH MG_ARCH_ARMCC #define MG_ENABLE_TCPIP 1 #define MG_ENABLE_CUSTOM_MILLIS 1- To enable the proper built-in driver for your board:
Now Mongoose will work with its own embedded TCP/IP stack, but we still need to provide a time baseBoard Add this macro NUCLEO-F429ZI #define MG_ENABLE_DRIVER_STM32F 1NUCLEO-F746ZG #define MG_ENABLE_DRIVER_STM32F 1NUCLEO-H743ZI #define MG_ENABLE_DRIVER_STM32H 1NUCLEO-H743ZI2 #define MG_ENABLE_DRIVER_STM32H 1
- To enable the proper built-in driver for your board:
Add a function
uint64_t mg_millis(void), this function will call a HAL function to get the running time in milliseconds:uint64_t mg_millis(void) { return HAL_GetTick(); }Finally, inside the
main()function, we'll initialize Mongoose, add the network initialization to get an IP address using DHCP, and since this microcontroller/board does not provide a unique MAC address, we'll also specify some fancy one:int main(void) { mx_init(); struct mg_mgr mgr; mg_mgr_init(&mgr); struct mg_tcpip_if mif = { .mac = {2, 0, 1, 2, 3, 4}, .driver = &mg_tcpip_driver_stm32f, }; mg_tcpip_init(&mgr, &mif); for (;;) mg_mgr_poll(&mgr, 100); }Yes, we removed the LED-blinking section and the printf() call
Now build and flash
With the terminal software of your choice, configure it for 115200bps. Open the proper USB serial port and you'll see Mongoose log. Once the DHCP server in your network assigns an address to your board, you'll see it:
...
b4e 2 mongoose.c:6382:onstatechange     READY, IP: 192.168.2.10
If you ping this address, it should respond
7. Implement a simple web server
Let's modify main.c to add a very simple web server; it will just respond with "ok" to any URI you request.
- Outside of the main() function, add the HTTP event handler, this function will be called when the event manager processes an HTTP message:
static void fn(struct mg_connection *c, int ev, void *ev_data) { if (ev == MG_EV_HTTP_MSG) mg_http_reply(c, 200, "", "ok\n"); } - Finally, inside the main() function, we'll add an HTTP listener on any address. We do this after the event manager initialization and of course before the infinite loop. Passing a pointer to the former function
fnas a parameter, we instruct the event manager to call this event handler for that:mg_http_listen(&mgr, "http://0.0.0.0", fn, &mgr); - Now build and flash
- Once the DHCP server in your network assigns an address to your board, you'll see it in the log; it should be the same as before, anyway.
- Point your browser to
http://IP_ADDRESS, whereIP_ADDRESSis the board's IP address; you'll see the "ok" message
This is of course a very simple and limited example, but is also the cornerstone on which to build a RESTful server.
8 Add the full Web UI
Let's add a more advanced Web UI to our web server, a full device dashboard functionality
- Download net.c, net.h and packed_fs.c with your browser; then drag and drop them to your project folder
- In the Project explorer, select
Source Group 1, right click and on the popup menu selectAdd Existing Files to Group 'Source Group 1'.... Select and add these files. - The file net.c contains all the event handler functions to provide the necessary functionality; while packed_fs.c contains an embedded filesystem holding all the UI static files
- Now, let's
#include "net.h"so we can call the device dashboard functions. The device dashboard code defaults to using port 8000, to be able to listen at port 80 we need to redefine theHTTP_URLmacro; let's add a new preprocessor symbol. In the Project explorer, make sureTarget 1is selected and follow the menu toProject -> Options for Target 'Target 1'; then, in theC/C++ (AC6)tab, addDefine: HTTP_URL= \"http://0.0.0.0/\"to the Preprocessor Symbols section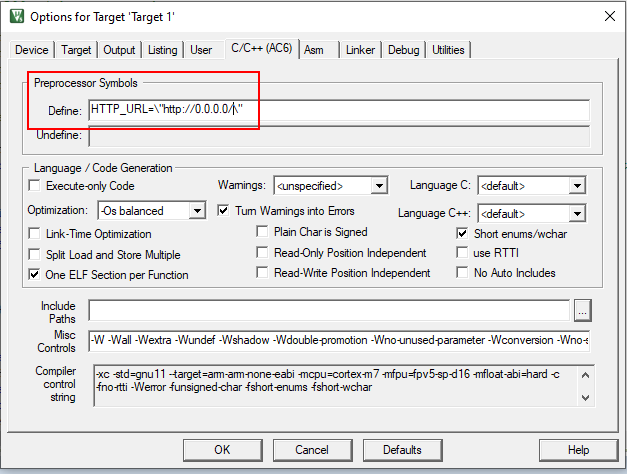
- Finally, in our main() function, we'll remove the HTTP listener and call the device dashboard init function, that carries all needed initializations:
web_init(&mgr); - Now build and flash
- Once the DHCP server in your network assigns an address to your board, you'll see it in the log; it should be the same as before, anyway.
- Point your browser to
http://IP_ADDRESS, whereIP_ADDRESSis the board's IP address; you should see a login screen.
From here on, if you want to try the dashboard features please go to the device dashboard tutorial and follow some of the steps depicted there.