


SSL/TLS
TLS for servers
In this section, we give a very short and quick description on how to enable SSL/TLS for a server (listening) connection - for example, HTTPS server.
- Obtain TLS certificate and private key files (or create your own self-signed certificate, see below)
- In the event handler function, call
mg_tls_init()on theMG_EV_ACCEPTevent:static void fn(struct mg_connection *c, int ev, void *ev_data) { if (ev == MG_EV_ACCEPT) { struct mg_tls_opts opts = {.cert = mg_unpacked("/certs/server_cert.pem"), .key = mg_unpacked("/certs/server_key.pem")}; mg_tls_init(c, &opts); } ... } - Rebuild the application, see build instructions below
You can see example code in
If you need to validate client certificates, see below for certificate validity dates and system time
TLS for clients
In order to TLS-enable client connections,
Obtain the CA (Certificate Authority) certificate file
In the event handler function, call
mg_tls_init()on theMG_EV_CONNECTevent:static void fn(struct mg_connection *c, int ev, void *ev_data) { if (ev == MG_EV_CONNECT) { struct mg_tls_opts opts = {.ca = mg_unpacked("/certs/ca.pem")}; mg_tls_init(c, &opts); } ... }- Optionally, you may also set
nameto enable host name validation. If you also omit thecaentry, no certificate verification will take place, only host name will be checked.
- Optionally, you may also set
If you need to do something once the TLS handshake is finished, handle the
MG_EV_TLS_HSevent:Rebuild the application, see build instructions below
You can see example code in
- The MQTT client example
- The HTTP client example
- The TCP client and server example
- The SMTP client example
See below for certificate validity dates and system time
Combined event handlers
When dealing with both TLS and non-TLS connections, e.g.: a web server serving both HTTP and HTTPS, you don't need a specific event handler for your TLS listener. Both mg_listen() and mg_connect() check the URL and set the is_tls flag in the struct mg_connection passed to your event handler. See server and client examples above.
If your URL can't be detected, you have to inform the handler when it is dealing with a TLS connection; this can be done by passing some fn_data (e.g.: non-NULL) when calling listen/connect, and checking for it (e.g.: c->fn_data != NULL) in the handler.
If you don't call mg_tls_init when receiving a respective MG_EV_ACCEPT / MG_EV_CONNECT event, that connection will downgrade to non-TLS, the is_tls flag will be reset.
Certificates overview
TLS provides two major benefits:
- traffic encryption, which makes it impossible to sniff and look inside the traffic, and
- authentication, which makes it possible to one side of the TLS connection to verify the identity of the other side.
Here we're talking about authentication. Authentication is implemented via certificates. A certificate has two parts - public and private. Talking in practical terms, three files are required to implement TLS authentication:
- TLS certificate. This is a "public" part. For example, a TLS-enabled server sends it to the client during the TLS handshake
- TLS private key. This is a "private" part
- TLS Certificate Authority (CA) file. It is used for verification of the "public" certificate sent by the server
TLS certificates are obtained from services like Let's Encrypt. The other possibility is self-signed certificates, which are mainly used for development.
Issuance and expiration dates
Certificates have validity dates, they are valid within a time frame specified by their issuers; this means that your system will need to have a valid and secure way to obtain the time, in order to be able to validate those dates.
Mongoose mg_tls_init() is able to get time from a public SNTP server when its system time has not been set and there's the need to validate a certificate issuance date. This is enough for examples and many devices; however, if a secure time source is required, the user needs to properly initialize mg_boot_timestamp_ms. That can be for example a private SNTP server, or even your OS.
Self-signed certificates
It is possible to generate certificate files. Note that servers using those files will not be trusted by browsers, because browsers use pre-installed CA files and know nothing about your generated certificates.
The command below uses the openssl command line tool to generate a self-signed
server certificate and a key file:
$ openssl req -nodes -new -x509 -keyout key.pem -out cert.pem
When generating keys for embedded hardware, you may want to use shorter elliptic-curve cryptography (ECC) options:
$ openssl ecparam -name prime256v1 -genkey -noout -out key.pem
$ openssl req -new -key key.pem -x509 -nodes -out cert.pem
Most likely you will need a CA certificate and a server certificate, that is: a self-signed ca.pem, and cert + key pair.
Our builtin TLS stack only supports ECC, the Mongoose repository contains a script to help generate these certificates, using the openssl command line tool:
If you require RSA, this is an example using the openssl command line tool:
## Common parameters
$ SUBJ="/C=IE/ST=Dublin/L=Docks/O=MyCompany/CN=howdy"

## Generate CA
$ openssl genrsa -out ca.key 2048
$ openssl req -new -x509 -days 365 -key ca.key -out ca.crt \
  -subj /C=IE/ST=Dublin/L=Docks/O=mos/CN=me

## Generate server cert
$ openssl genrsa -out server.key 2048
$ openssl req -new -key server.key -out server.csr -subj $SUBJ
$ openssl x509 -req -days 365 -in server.csr -CA ca.crt \
  -CAkey ca.key -set_serial 01 -out server.crt
Two-way TLS
Normally, when a client makes a connection to a TLS-enabled server, the server sends its certificate to the client and the client verifies it using its own CA (Certificate Authority) file. This way the client authenticates the server.
In the most common situation, the client verifies the server, but the server does not verify the client. For example, browsers (clients) use a big CA file (or many CA files) to verify HTTPS servers.
Clients can also provide certificates during the TLS handshake, and the server can
verify it using a CA file. When both client and server use certificates,
and verify the other side using a CA file, it is called two-way TLS.
In order to implement two-way TLS, now both client and server must have their own
cert, key and ca specified in mg_tls_opts:
For a server:
  struct mg_tls_opts opts = {.ca = mg_unpacked("/certs/ca.pem"),
                             .cert = mg_unpacked("/certs/server_cert.pem"),
                             .key = mg_unpacked("/certs/server_key.pem")};
  mg_tls_init(c, &opts);
For a client:
  struct mg_tls_opts opts = {.ca = mg_unpacked("/certs/ca.pem"),
                             .cert = mg_unpacked("/certs/client_cert.pem"),
                             .key = mg_unpacked("/certs/client_key.pem")};
  mg_tls_init(c, &opts);
Two-way TLS certificates
It is possible to generate self-signed ca.pem, and cert + key pairs for both client and server for two-way (mutual) authentication.
See above for details and CA + server key generation. For the client, using ECC:
Using RSA:
## Generate client cert
$ openssl genrsa -out client.key 2048
$ openssl req -new -key client.key -out client.csr -subj $SUBJ
$ openssl x509 -req -days 365 -in client.csr -CA ca.crt \
  -CAkey ca.key -set_serial 01 -out client.crt
How to load credentials
Certificates and keys can be loaded from a file in a supported filesystem using
mg_file_read:struct mg_str data = mg_file_read(&mg_fs_posix, "test/data/ca.pem"); struct mg_tls_opts opts = {.ca = data}; ... mg_free(data.buf);This copies the file in memory that has to be freed later when the program exits.
They can also be loaded from a file in an embedded filesystem, using
mg_unpacked()as shown above:struct mg_tls_opts opts = {.ca = mg_unpacked("/certs/ca.pem")};This accesses the file directly from the code, where it has been embedded.
Finally, certificates and keys can be defined as C strings in source code:
How to build
Use the MG_TLS macro in your compile options:
MG_TLS=MG_TLS_BUILTINto use Mongoose built-in TLS functionsMG_TLS=MG_TLS_MBEDto build using MbedTLSMG_TLS=MG_TLS_OPENSSLto build using OpenSSLMG_TLS=MG_TLS_WOLFSSLto build using WolfSSL. This library also requires that you define the macroEXTERNAL_OPTS_OPENVPN
Many of our examples default to building with Mongoose built-in TLS support. For those that don't, just do
make all CFLAGS_EXTRA="-DMG_TLS=MG_TLS_BUILTIN"
Most examples can pull and build a known and tested version of MbedTLS. Then, depending on your operating system, you may have additional options
The following instructions assume you've already followed the Build Tools tutorial to setup your development environment.
Embedded hardware
Most of our Wizard-generated examples default to building with Mongoose built-in TLS support; except for those cases where the default build environment already has its own TLS library.
To build other embedded hardware examples with Mongoose built-in TLS support, just do
make build CFLAGS_EXTRA="-DMG_TLS=MG_TLS_BUILTIN"
Some platforms include support for MbedTLS. In CMake platforms, like Espressif SDK, it is just a matter of setting the proper Mongoose compile option in the CMakeList file:
component_compile_options(-DMG_TLS=MG_TLS_MBED)
However, beyond the simple first try, we recommend keeping all Mongoose configuration options for an embedded target in its mongoose_config.h file:
#define MG_TLS MG_TLS_MBED
See for example the device-dashboard tutorial for the ESP32.
For bare metal examples, some include support to clone MbedTLS and build with it. Just run:
make TLS=mbedtls
However, all devices with enough memory can take advantage of Mongoose's built-in TLS 1.3 library, just add this to your mongoose_config.h file.
#define MG_TLS MG_TLS_BUILTIN
See for example the device-dashboard tutorial for the STM32 series.
Linux
Assuming Ubuntu Linux, start a terminal and install the library of your choice:
sudo apt -y update
sudo apt -y install libmbedtls-dev
sudo apt -y install libssl-dev
Then use the CFLAGS_EXTRA argument to pass the necessary additional compile options, as follows:
make CFLAGS_EXTRA="-DMG_TLS=MG_TLS_MBED -lmbedtls -lmbedcrypto -lmbedx509"to build for MbedTLSmake CFLAGS_EXTRA="-DMG_TLS=MG_TLS_OPENSSL -lssl -lcrypto"to build for OpenSSLmake CFLAGS_EXTRA="-DMG_TLS=MG_TLS_WOLFSSL -DEXTERNAL_OPTS_OPENVPN -lwolfssl"to build for WolfSSL
For other similar distributions and operating systems, check pkg-config below
MacOS
Start a terminal, and install the library of your choice:
brew install mbedtls
brew install openssl
brew install wolfssl
Then use the CFLAGS_EXTRA argument to pass the necessary additional compile options, as follows:
make CFLAGS_EXTRA="-DMG_TLS=MG_TLS_MBED -lmbedtls -lmbedcrypto -lmbedx509 -I$(MBEDTLS_DIR)/include -L$(MBEDTLS_DIR)/lib"to build for MbedTLSmake CFLAGS_EXTRA="-DMG_TLS=MG_TLS_OPENSSL -lssl -lcrypto -I$(OPENSSL_DIR)/include -L$(OPENSSL_DIR)/lib"to build for OpenSSLmake CFLAGS_EXTRA="-DMG_TLS=MG_TLS_WOLFSSL -DEXTERNAL_OPTS_OPENVPN -lwolfssl -I$(WOLFSSL_DIR)/include -L$(WOLFSSL_DIR)/lib"to build for WolfSSL
If you use brew, you can easily get those paths by asking it:
$ MBEDTLS_DIR=$(echo $(brew --cellar)/mbedtls*/*)
$ OPENSSL_DIR=$(echo $(brew --cellar)/openssl*/*)
$ WOLFSSL_DIR=$(echo $(brew --cellar)/wolfssl*/*)
If you don't use brew, or still see compiler or linker errors messages, see pkg-config below
Windows
Only what the example provides in its Makefile is supported
pkg-config
If, when using your system libraries, you see a compiler error message like "Cannot find .... file", your system needs extra paths for includes and/or libs, and/or link options; usually the former. This means adding -I path/to/include to tell where installed TLS headers are, and/or -L path/to/lib to tell where installed TLS shared libs are.
These paths and link options are usually determined in GNU/Linux-like systems using pkg-config. Sometimes the package uses the standard paths and no extra paths are needed; others they are installed in a different path to avoid conflicts and flags are required:
$ pkg-config --cflags --libs openssl
-lssl -lcrypto
$ pkg-config --cflags --libs openssl11
-I/usr/include/openssl11  -L/usr/lib64/openssl11 -lssl -lcrypto
$ pkg-config --cflags --libs-only-L openssl11
-I/usr/include/openssl11  -L/usr/lib64/openssl11
$ pkg-config --libs-only-l openssl11
-lssl -lcrypto
This requires that the relevant packages have installed their packagename.pc files in the default path where pkg-config will search for them; otherwise you have to set the PKG_CONFIG_PATH environment variable to where they reside.
To pass these extra options to the make command, extend the CFLAGS_EXTRA argument as, for example, we did for MacOS above.
The link options are mostly the same among systems and usually there is no need to add to them.
Check your system for relevant paths and compiler flags
Debugging TLS traffic
Mongoose supports the traditional OpenSSL's SSLKEYLOGFILE environment variable (when running in an operating system, of course). For this to work, build Mongoose with MG_TLS_SSLKEYLOGFILE defined, and export the aforementioned environment variable with the desired file path.
Assuming Linux:
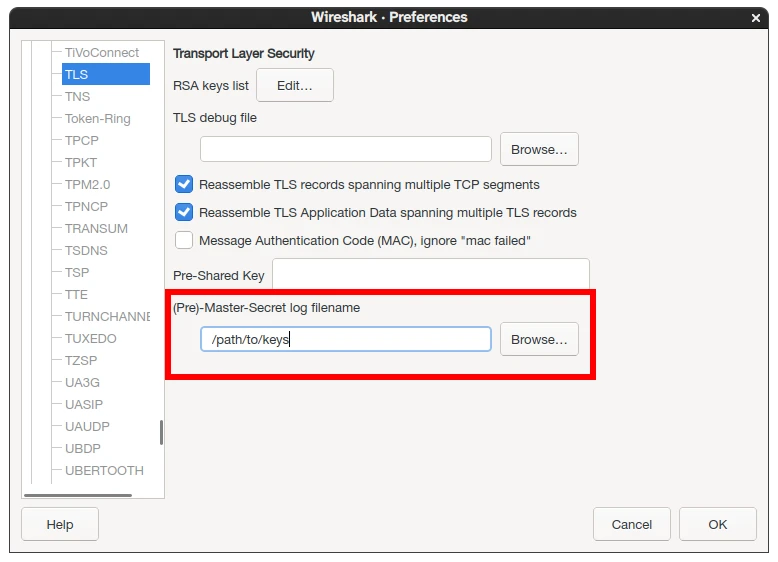
$ export SSLKEYLOGFILE=/path/to/keys
make CFLAGS_EXTRA="-DMG_TLS=MG_TLS_BUILTIN -DMG_TLS_SSLKEYLOGFILE"to build for our builtin TLSmake CFLAGS_EXTRA="-DMG_TLS=MG_TLS_OPENSSL -lssl -lcrypto -DMG_TLS_SSLKEYLOGFILE"to build for OpenSSLmake CFLAGS_EXTRA="-DMG_TLS=MG_TLS_WOLFSSL -DEXTERNAL_OPTS_OPENVPN -lwolfssl -DMG_TLS_SSLKEYLOGFILE"to build for WolfSSL
Then, just configure your network sniffer to use that file to read the keys; e.g: in Wireshark, Edit -> Preferences -> Protocols:
A note regarding MbedTLS and PSA
When using PSA, MbedTLS allocates global data. In embedded scenarios, where the application never exits, this is not a problem per se. However, with operating systems or when the application needs to free al resources when leaving, a call to mbedtls_psa_crypto_free() must be done. This applies to MbedTLS >= 3 with MBEDTLS_PSA_CRYPTO_C defined.
int main(int argc, char* argv[])
{
  struct mg_mgr mgr;
  mg_mgr_init(&mgr);
  ...
  while (!done) {
      mg_mgr_poll(&mgr, 50);
  }

  mg_mgr_free(&mgr);
  mbedtls_psa_crypto_free();

  return 0;
}
This also applies to avoid triggering memory-leak detectors in tests, this is what we do: