


Build tools
The following instructions guide on setting up a development environment for building and running Mongoose Library examples, as well as developing new applications. The required tools are:
- Git, https://git-scm.com/ - for downloading source code and version control
- GCC / MinGW compiler - for compiling desktop / server programs
- GNU make, http://www.gnu.org/software/make/ - for build automation
If you are going to build for embedded systems, extra tools are required:
- for ARM embedded systems ARM GCC, https://developer.arm.com/Tools%20and%20Software/GNU%20Toolchain
- pick the right one for your platform and environment: hosted cross toolchain for the AArch-32 architecture on bare metal:
arm-none-eabi
- pick the right one for your platform and environment: hosted cross toolchain for the AArch-32 architecture on bare metal:
- for RISCV embedded systems RISCV GCC,https://github.com/riscv-collab/riscv-gnu-toolchain
- for RP2040 and RP2350 devices CMake, https://cmake.org - for building
- for STM32 devices STM32CubeProgrammer, https://www.st.com/en/development-tools/stm32cubeprog.html - for flashing
- Alternatively, you may wish to use stlink, https://github.com/stlink-org/stlink
- for NXP devices LinkServer (also included with MCUXpresso) - for flashing
- for TI devices Uniflash, https://www.ti.com/tool/UNIFLASH - for flashing
MacOS setup instructions
Start a terminal, and execute:
/bin/bash -c "$(curl -fsSL https://raw.githubusercontent.com/Homebrew/install/HEAD/install.sh)"
brew install gcc make git gcc-arm-embedded stlink cmake uniflash riscv-tools
- for STM32 devices Download and install STM32CubeProgrammer, or rely on stlink, installed above
Linux setup instructions
Assuming Ubuntu Linux. Start a terminal, and execute:
sudo apt -y update
sudo apt -y install build-essential make gcc-arm-none-eabi stlink-tools git cmake gcc-riscv64-unknown-elf
- for STM32 devices Download and install STM32CubeProgrammer, or rely on stlink, installed above
Windows setup instructions
- Enable "Developer Mode" in Windows 10/11, for symbolic link support: "Open Settings" / "Privacy & Security" / "For developers", then set "Developer Mode" to "on".
- Install Git from https://git-scm.com/download/win. Check "Enable symlink" during installation.
If you have Git already installed, either reinstall it with the symlink support on, or enter
git config --global core.symlinks truein the command prompt to enable symlinks in Git - Download and run mingwInstaller.exe
- Set install destination to
c:\ - Accept suggested default settings
- Go to
c:\mingw32\binfolder and renamemingw32-make.exetomake.exe - Add
c:\mingw32\binto thePathenvironment variable. For Windows 11 the steps are:- Open Start Search, type "env", and select "Edit the system environment variables"
- Click the "Environment Variables..."
- In the "System Variables" section, locate "Path", and click edit
- In the "Edit environment variable" UI, click "New" to add the new path
- Set install destination to
- for ARM embedded systems Download and install https://developer.arm.com/Tools%20and%20Software/GNU%20Toolchain
- Enable "Add path to environment variable" during the installation
- for RISCV embedded systems Download and install risc-v-gcc10.1.0.exe, accept default installation settings.
- for RP2040 and RP2350 devices Install CMake; choose "Add CMake to the system PATH". You may also need to install Python 3
- for STM32 devices
Create a
C:\toolsfolder and addC:\toolsto thePathenvironment variable- Download and install STM32CubeProgrammer
- Alternatively, you may wish to download stlink; unpack
bin/st-flash.exeinto theC:\toolsfolder- If stlink does not work, you need a driver. Unplug your board and install ST's ST-LINK driver
- Alternatively, you may install Zadig; it will detect the device missing a driver and let you install a proper one. However, this is not compatible with Keil. Try WinUSB first:
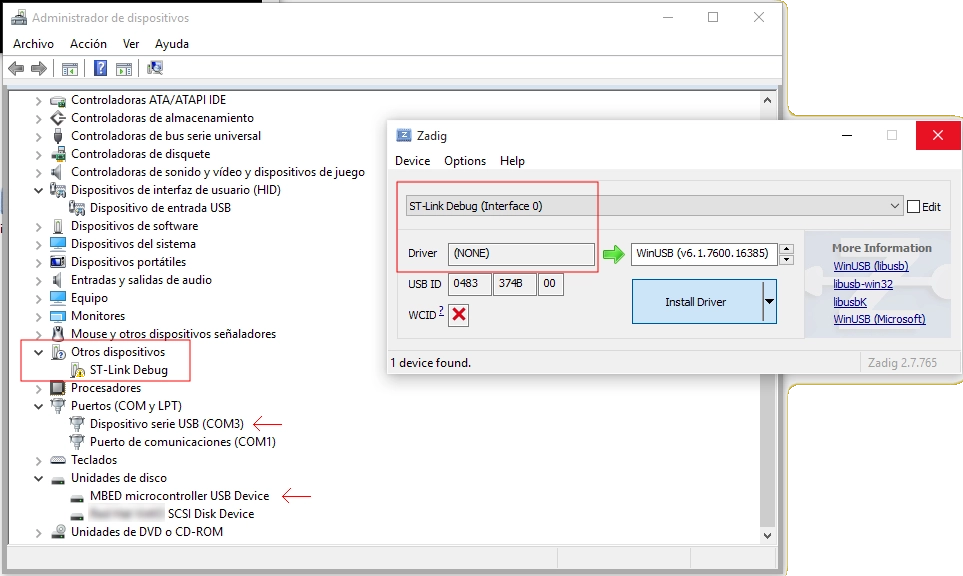
- Alternatively, you may install Zadig; it will detect the device missing a driver and let you install a proper one. However, this is not compatible with Keil. Try WinUSB first:
- If stlink does not work, you need a driver. Unplug your board and install ST's ST-LINK driver