


Raspberry Pi Pico + LAN8720
Overview
This tutorial demonstrates how Mongoose Library can be used on an RP2040-based board using the Pico-SDK and Mongoose's built-in TCP/IP stack. We implement a minimal static web server that responds "ok" to any URL
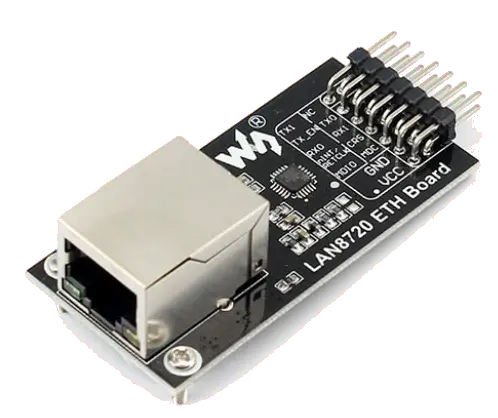
To connect to an Ethernet network, we use an add-on board containing a PHY, in this case a LAN8720
We take the 50MHz reference clock from the LAN8720 and configure the RP2040 to use it (so it works at 50MHz); then we make use of several PIO state machines to perform the RMII tasks: send frames, receive frames, and control the PHY (SMI).
Hardware connections
The reference clock (labeled as RETCLK in the example LAN8720 board) can be connected to either GPIO20 or GPIO22; we've used the former one.
Most other pins you can change at will, bear in mind that because we use the PIO, each function requires consecutive GPIOs, see below
| LAN8720 | Raspberry Pi Pico | ||
|---|---|---|---|
| 1, 2 | VCC | 3V3 | 36 |
| 3, 4 | GND | GND | 38 |
| 5 | MDC | GPIO15 | 20 |
| 6 | MDIO | GPIO14 | 19 |
| 7 | CRS | GPIO8 | 11 |
| 8 | nINT / RETCLK | GPIO20 | 26 |
| 9 | RX1 | GPIO7 | 10 |
| 10 | RX0 | GPIO6 | 9 |
| 11 | TX0 | GPIO10 | 14 |
| 12 | TX-EN | GPIO12 | 16 |
| 13 | |||
| 14 | TX1 | GPIO11 | 15 |
Project structure
This example uses the Pico-SDK and compiles with its standard toolchain, it has the following files:
- main.c: provides the
main()entry point with hardware init, clock initialization code, LED blinking, providing an interface with TinyUSB, initializing the network, and calling the event manager - driver_rp2040_rmii.c - the low-level code for the driver emulating a simple MAC controller
- driver_rp2040_rmii.h - the driver header file
- CMakeLists.txt - A cmake file that selects the source files and compilation options
- Makefile - mainly pulls the SDK from its Github repo and calls cmake
mongoose.c,mongoose.h- Mongoose Library
Build and run
- Follow the Build Tools tutorial to setup your development environment.
- Start a terminal in the project directory; clone the Mongoose Library repo, and run the
make buildcommand:git clone https://github.com/cesanta/mongoose cd mongoose/tutorials/pico-sdk/pico-rmii make build - Once the build succeeds, boot your Pico in USB Mass Storage Mode by holding down the
BOOTSELbutton while you plug it into the USB port. Once it is connected, then release theBOOTSELbutton. It should automatically mount as a new USB disk in your machine. Now either manually copy or drag and drop the generatedbuild/firmware.uf2file into this new USB disk device. - The Pico will flash this code and reboot, unmounting this disk and running the flashed code.
- Now open a second terminal, this will be our serial console to see the logs. Run a serial port software (we use picocom; make sure you configure it at 115200bps and to add a carriage return). Device name is usually
/dev/ttyACM0. Wait a bit and plug your network cable:picocom /dev/ttyACM0 -i -b 115200 6213 1 mongoose.c:6757:onstatechange Link up 6217 3 mongoose.c:6840:tx_dhcp_discover DHCP discover sent 621b 3 mongoose.c:6723:arp_cache_add ARP cache: added 192.168.69.2 @ 52:54:... 6222 2 mongoose.c:6749:onstatechange READY, IP: 192.168.69.243 6227 2 mongoose.c:6750:onstatechange GW: 192.168.69.1 622b 2 mongoose.c:6752:onstatechange Lease: 21600 sec - Start a browser on
http://IP_ADDRESSwhereIP_ADDRESSis the board's IP address assigned by your DHCP server. You should seeok.- You can also use curl:
curl 192.168.69.243
ok
- You can also use curl:
Compilation options
Network operations need a time base to calculate timeouts; this, as well as random number generation, will be provided by the SDK, and Mongoose needs to know how to link to them. We define these and other compilation options in mongoose_config.h
MG_ARCH = MG_ARCH_RP2040- configures Mongoose to work with the RP2040 SDKMG_ENABLE_TCPIP = 1- enables the built-in TCP/IP stack
main.c overview
This example can be divided in the following blocks:
- Initialize the microcontroller for this particular board
- Initialize Mongoose
- Initialize the networking stack
- Run Mongoose
MCU and board initialization
We call SDK functions to initialize the MCU clock and the stdio:
Mongoose initialization
Then we initialize Mongoose, this is no different from what we always do in any example.
TCP/IP initialization
The built-in TCP/IP stack has to be enabled to be compiled in, and so Mongoose will work in association with it. This is done in the CMakeLists.txt file by defining MG_ENABLE_TCPIP=1.
Then this networking stack has to be configured and initialized. This is done by calling mg_tcpip_init() and passing it a pointer to a struct mg_tcpip_if. Inside this structure:
- have pointers to a
struct mg_tcpip_driverand any extra data that it could need. This structure is usually provided by the driver and we just reference it; in this case, we'll see the internals later - For DHCP: set
ipas zero - For a static configuration, specify
ip,mask, andgwin network byte order
In this example, we use DHCP:
Note that, we also need to specify a unique MAC address. For this example we chose a fancy unicast locally administered address.
Once we init the networking stack, it will call our driver. The driver will use the PIO and some DMA channels to simulate an elementary MAC controller
Run Mongoose
Then we run Mongoose. This is no different from what we always do in any example, though note that it should be run after network initialization. The logic is standard: initialize the event manager (as we already did), start a listener on port 80, and fall into an infinite event loop:
The listener will call this function when it receives an HTTP request:
There we just reply "ok"
Under the hood
This subsection is only for those with enough curiosity or interested in writing their own driver for Mongoose. Feel free to skip ahead if this does not apply to you. For more information on how to develop your own driver, follow the CMSIS-Driver tutorial
The struct mg_tcpip_driver provides pointers to driver functionality. An init function called for driver initialization, a tx function to be called when Mongoose needs to send a frame, and an up function returning the state of the interface:
To know whether the interface is up or not, Mongoose calls the function we configured, and we ask the PHY:
To send a frame, Mongoose calls the function we configured. There, we check if the DMA controller has finished sending any prior frames, then copy the frame to its buffer and retrigger the transfer process. It will pass each byte to the PIO to be sent to the PHY:
If a driver has to be polled for data, then it will also implement an rx() function. Otherwise, if received data is asynchronous to Mongoose, it provides an internal lock-free queue and we can take advantage of it. The user (as in this example) may set the queue length to the required size, otherwise a default will be used and Mongoose will allocate the necessary memory for us.
When the PIO state machine in charge of taking data out of the PHY detects the end of a frame, it will generate an interrupt.
We then will stop the DMA transfer and reconfigure it by switching buffers in a ping-pong configuration; then we'll push that frame to the queue by calling mg_tcpip_qwrite():
The TCP/IP stack will run on the next call to the event manager and then pop the frame from the queue to be processed. In this case, as we configured the stack for that, it will check its CRC and the frame destination address:
The init function, not shown here, initializes the DMA channels and loads the PIO programs; initializing all the software MAC controller subsections.