


STM32 Nucleo RNDIS
Overview
This tutorial shows how to use Mongoose Library over RNDIS through a USB connection, running on STM32 Nucleo development boards. We provide instructions for NUCLEO-F746ZG, NUCLEO-F429ZI.
We implement a very basic web server that responds "hi" to any URL and provides a minimal example of a REST API to change the debug level.
Features of this implementation include:
- Uses ARM CMSIS Core headers and STM32 CMSIS device headers
- Uses TinyUSB headers and sources
- Uses Mongoose's built-in TCP/IP stack, we interface to TinyUSB in this example
- Does NOT use an external network stack like lwIP, or RTOS like FreeRTOS
Though we specifically link to the files for a NUCLEO-F746ZG implementation, most references in this tutorial are valid for any supported board:
| Board | Files |
|---|---|
| NUCLEO-F429ZI | tutorials/stm32/nucleo-f429zi-make-baremetal-builtin-rndis |
| NUCLEO-F746ZG | tutorials/stm32/nucleo-f746zg-make-baremetal-builtin-rndis |
This example is a plain GCC make-based project with the following files:
- main.c - provides the
main()entry point with hardware init, LED blinking, providing an interface with TinyUSB, initializing the network, and calling the event manager - hal.h - provides a simple API on top of the CMSIS API, like
usb_init(),gpio_write(),uart_init(), etc - sysinit.c - provides the
SystemInit()function with system clock setup, SysTick setup, etc - syscalls.c - provides low level functions expected by the ARM GCC C library
- link.ld - a GNU linker script file, used for building the firmware binary
- Makefile - a GNU Makefile for building, flashing and testing the project
- usb_descriptors.c - provides TinyUSB class-dependent definitions and code
- tusb_config.h - provides the TinyUSB configuration
mongoose.c,mongoose.h- Mongoose Librarystartup_stm32f746xx.s- part of STM32 CMSIS, used for startup code and IRQ vector table
Below is a general process outline:
- The board IP addressing will be static:
192.168.3.1. If this conflicts with your network, change IP address and network mask inmain.c; see below - Build the example (see below) and run it on a development board connected to the debugging port (CN1) as usual.
- The firmware initializes the USB stack; see below
- After initialization, the application starts Mongoose's event loop and blinks a blue LED
- Once the blue LED starts blinking, the example is ready
- Connect the other USB connector (CN13), which connects to the MCU, to another USB port in your computer.
- The board will enumerate as a USB Communication Device Class (CDC) Ethernet Control Model (ECM) device, and also as a Remote Network Driver Interface Specification (RNDIS) device. This allows us to work with different host operating systems.
- The host will then add a new networking interface and will ask for an IP address. Our device will respond assigning it an address corresponding to its own address +1:
192.168.3.2 - Open your web browser and connect to the board IP address (
192.168.3.1), you should see a greeting
Build and run
Follow the Build Tools tutorial to setup your development environment.
Start a terminal in the project directory; clone the Mongoose Library repo, and run the
make buildcommand:git clone https://github.com/cesanta/mongoose cd mongoose/tutorials/stm32/nucleo-f746zg-make-baremetal-builtin-rndis make buildIn order to flash this recently built firmware to your board, plug it in a USB port and execute:
make flashAs long as there is only one board plugged in, stlink will find it; though we need to know the serial port device to be able to get the log information. In Linux it is probably
/dev/ttyACM0When the firmware is flashed, the board should signal its state by blinking the blue LED. We now need to see the device logs.
To connect to the board, in this example we'll be using picocom; we configure it for 115200bps. Use the proper serial device.
picocom /dev/ttyACM0 -i -b 115200
picocom v2.2
...
Terminal ready
0 2 main.c:86:main                      Init TCP/IP stack ...
5 3 mongoose.c:3493:mg_listen           1 0x0 tcp://0.0.0.0:80
b 2 main.c:98:main                      Init USB ...
f 2 main.c:112:main                     Init done, starting main loop ...
Now plug your board's MCU USB connector (CN13), you should see something like this in your log:
1775 2 mongoose.c:6749:onstatechange READY, IP: 192.168.3.1 177a 2 mongoose.c:6750:onstatechange GW: 0.0.0.0- On a Linux host, you'll see something like this in the system log (
dmesg -w):[30922.493149] usb 5-4: new full-speed USB device number 2 using ohci-pci [30922.663197] usb 5-4: New USB device found, idVendor=cafe, idProduct=4020, bcdDevice= 1.01 [30922.663207] usb 5-4: New USB device strings: Mfr=1, Product=2, SerialNumber=3 [30922.663213] usb 5-4: Product: TinyUSB Device [30922.663218] usb 5-4: Manufacturer: TinyUSB [30922.663222] usb 5-4: SerialNumber: 123456 [30923.230334] usbcore: registered new interface driver cdc_ether [30923.254926] rndis_host 5-4:1.0 usb0: register 'rndis_host' at usb-0000:00:13.0-4, RNDIS device, 5e:11:1d:d8:a6:b2 [30923.255926] usbcore: registered new interface driver rndis_host - On MacOS, CDC-ECM will be picked:
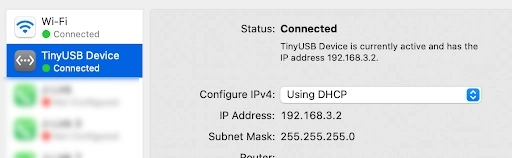
- On Windows, RNDIS:
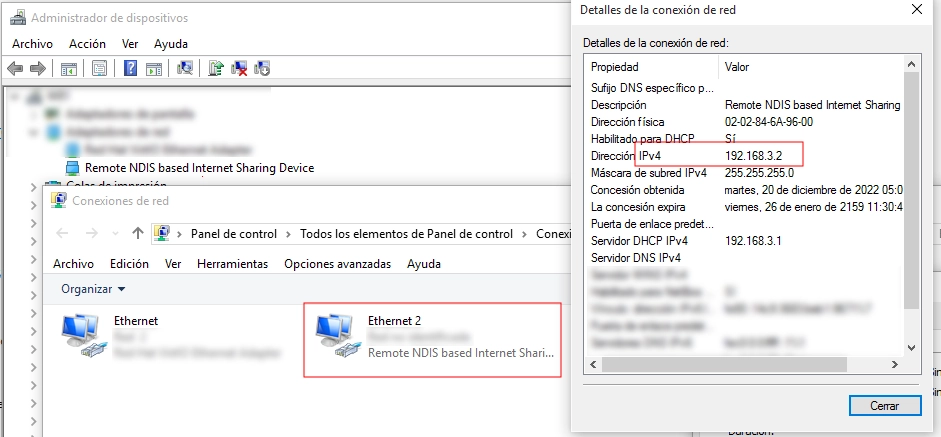
- On a Linux host, you'll see something like this in the system log (
Now start a browser on
192.168.3.1. You should see a greeting. You can also use curl:curl 192.168.3.1 hi
Compilation options
MG_ARCH = MG_ARCH_ARMGCC- configures Mongoose to work with the Newlib runtime libraryMG_ENABLE_CUSTOM_MILLIS = 1- lets the firmware code overridemg_millis()MG_ENABLE_CUSTOM_RANDOM = 1- lets the firmware code overridemg_random()to use the device hardware RNGMG_ENABLE_TCPIP = 1- enables the built-in TCP/IP stack
We define these in mongoose_config.h
main.c overview
This example can be divided in the following blocks:
- Provide a time base in milliseconds
- TinyUSB integration for this microcontroller
- Initialize the microcontroller for this particular board
- Initialize the USB controller and stack
- Initialize Mongoose
- Initialize the networking stack
- Run Mongoose and TinyUSB
- Under the hood: interfacing Mongoose to TinyUSB, driver internals
Custom mg_millis()
Network operations need a time base to calculate timeouts. Mongoose supports a number of well-known architectures, but since here we are working at the bare-metal level, we need to provide our own custom function. The necessary actions are:
- Define
MG_ENABLE_CUSTOM_MILLIS=1which is done in the Makefile - Provide a custom
uint64_t mg_millis(void)function:
In this example, this function is based on ARM's SysTick:
Custom mg_random()
Some network operations require the generation of random numbers, from simple port numbers that should be different on every reset to complex TLS operations. Mongoose supports a number of well-known architectures, but since here we are working at the bare-metal level, we need to provide our own custom function or default to the standard pseudo-random number generator. The necessary actions are:
- Define
MG_ENABLE_CUSTOM_RANDOM=1which is done in the Makefile - Provide a custom
void mg_random(void *buf, size_t len)function:
In this example, this function uses the microcontroller's built-in RNG through the function rng_read() defined in hal.h
TinyUSB integration
In the Makefile, we clone the TinyUSB repository at a stable branch; then we set the proper paths for include files and required code:
tinyusb/src/: headers and code, including class code. We cherry picked the necessary files from this subtree, see the Makefiletinyusb/lib/networking: headers and code. We cherry picked the necessary files from this subtree, see the Makefiletinyusb/src/portable/synopsys/dwc2/dcd_dwc2.c: the specific code for the USB controller in this MCUusb_descriptors.c: definitions and code to present the required descriptors for the classes in usetusb_config.h: here we do our main integration job, defining the specific microcontroller, baremetal operation, no debugging, device mode, and device type
| Board | Device (Rev) | TinyUSB CFG_TUSB_MCU option |
|---|---|---|
| NUCLEO-F429ZI | STM32F429ZIT6 | OPT_MCU_STM32F4 |
| NUCLEO-F746ZG | STM32F746ZGT6 | OPT_MCU_STM32F7 |
We need to route USB controller interrupts to the TinyUSB handler:
Then, as we'll see below, as this is bare-metal code, we'll periodically call its main handler
Then TinyUSB will call us back when it has finished initializing the network, when it has received a frame, and when it can send a frame:
void tud_network_init_cb(void);
bool tud_network_recv_cb(const uint8_t *buf, uint16_t len);
uint16_t tud_network_xmit_cb(uint8_t *dst, void *ref, uint16_t arg);
We will ask TinyUSB if we can transmit and to do it, using these function calls:
  tud_network_can_xmit(len);
  tud_network_xmit(buf, len);
MCU and board initialization
Microcontroller support is provided by CMSIS, and the hal.h and sysinit.c files. The microcontroller and its clock are initialized in sysinit.c by a standard function called by CMSIS startup procedure. In our main() function, we call other functions to initialize those peripherals we are going to use:
In this particular case, we've set the CPU operating frequency as a function of the USB bus frequency.
USB controller and stack initialization
The USB controller initialization follows. We need to enable the USB GPIO pins, peripheral clock, and VBUS configuration for this board; we finally call TinyUSB initialization:
| Board | Device (Rev) | Controller Initialization code |
|---|---|---|
| NUCLEO-F429ZI | STM32F429ZIT6 | hal.h |
| NUCLEO-F746ZG | STM32F746ZGT6 | hal.h |
Mongoose initialization
Then we initialize Mongoose, this is no different from what we always do in any example.
There is also a timer that we use to blink the blue LED
For more information on timers, check the timers tutorial.
TCP/IP initialization
The built-in TCP/IP stack has to be enabled to be compiled in, and so Mongoose will work in association with it. This is done by defining MG_ENABLE_TCPIP=1. We do this in mongoose_config.h. In that file, we add the proper definition:
Then this networking stack has to be configured and initialized. This is done by calling mg_tcpip_init() and passing it a pointer to a struct mg_tcpip_if. Inside this structure:
- have pointers to a
struct mg_tpcpip_driverand any extra data that it could need. This structure is usually provided by the driver and we just reference it; in this case, we'll see the internals later - As we use a static IP address, specify
ipandmaskin network order. We don't provide a gateway as this interface is intended to only connect our device and the host - Since we need to provide an IP address to the host, we enable our internal DHCP server.
Note that, we also need to specify a unique MAC address; this example provides a macro to transform the chip built-in unique ID into a unicast locally administered address
The USB controller will be handled by TinyUSB, providing callback functions to be called when it has received a frame; then we will push it to a queue in Mongoose, from where it will pick it up later.
Run Mongoose and TinyUSB
Then we run Mongoose. This is no different from what we always do in any example, though note that it should be run after network initialization. The logic is standard: initialize the event manager (as we already did), start a listener on port 80, and fall into an infinite event loop:
In this case we also call TinyUSB's handler.The listener will call this function when it receives an HTTP request:
There we check the requested URL and either parse a JSON message or just reply "hi"
Under the hood
This subsection is only for those with enough curiosity or interested in writing their own driver for Mongoose. Feel free to skip ahead if this does not apply to you. For more information on how to develop your own driver, follow the CMSIS-Driver tutorial
The struct mg_tcpip_driver provides pointers to driver functionality. tx points to a function to be called when Mongoose needs to send a frame, and up points to a function returning the state of the interface:
To know whether the interface is up or not, Mongoose calls the function we configured, and we ask TinyUSB:
To send a frame, Mongoose calls the function we configured and we need to handle it to TinyUSB. If it can't be sent, we call its handler until it allows us to place a transmit request.
Due to the nature of USB and the way TinyUSB is written, the former is a blocking request for transmission; we'll be called back and instructed where to copy the data to be sent:
If a driver has to be polled for data, then it will also implement an rx() function. Otherwise, if received data is asynchronous to Mongoose, it provides an internal lock-free queue and we can take advantage of it. The user (as in this example) may set the queue length to the required size, otherwise a default will be used and Mongoose will allocate the necessary memory for us.
The USB controller will be handled by TinyUSB, providing callback functions to be called when it has received a frame; then we will push it to the queue by calling mg_tcpip_qwrite(). The TCP/IP stack will run on the next call to the event manager and then pop the frame from the queue to be processed.
If you want to use multi-threading, just follow Mongoose documentation as usual and call all mg_* API functions from the same RTOS task where Mongoose is running. The function mg_tcpip_qwrite(), however, can be called from any other context, so you could run TinyUSB in its own RTOS task if properly configured.