Device dashboard on NUCLEO-F746ZG - CMSIS-RTOS v1 (RTX), using Keil MDK
Overview
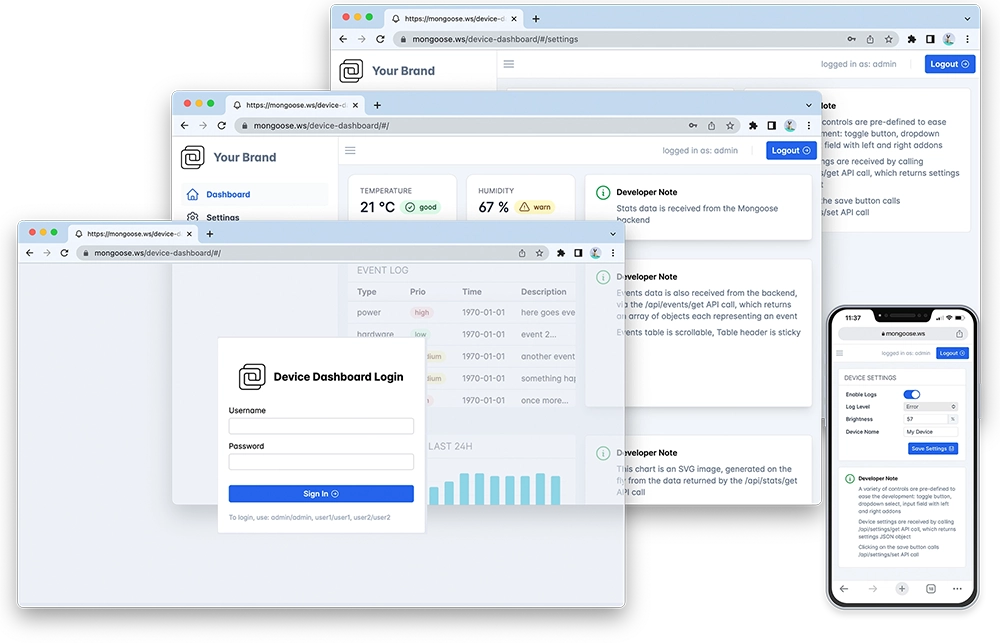
This tutorial shows how to implement a Web device dashboard using Mongoose Library over CMSIS-RTOS API v1 on an STM32 Nucleo-F746ZG development board, using the ARM Keil MDK development environment.

Features of this implementation include:
- Uses Keil RTX, ARM CMSIS Core and device headers through Software Packs
- Uses Mongoose's built-in TCP/IP stack, which includes an STM32 Ethernet driver
- Does NOT use an external network stack like lwIP or MDK (RL)
- The Web dashboard provides:
- User Authentication: login protection with multiple permission levels
- The web UI is optimized for size and for TLS usage
- Logged users can view/change device settings
- The web UI is fully embedded into the firmware binary, and does not need a filesystem to serve it, making it resilient
This example is a hardware adaptation of the Device Dashboard that can run on Mac/Linux/Windows. Mongoose Library, being cross-platform, allows to develop and run the same code on different platforms. That means: all functionality related to networking can be developed and debugged on a workstation, and then run as-is on an embedded device - and this example is a demonstration of that.
Take your time to navigate and study the Device Dashboard tutorial. Here, we concentrate on the features specific to this embedded platform in the Keil MDK environment.
This example is a plain Keil MDK-based project with the following files of interest:
- main.c - provides the
main()entry point with hardware init, LED blinking and network init. - hal.h - provides an abstraction for MAC generation
- syscalls.c - provides a low level function to redirect debug output to a UART.
mongoose.c,mongoose.h- Mongoose Librarynet.c,net.h- part of the device dashboard example, contains the Web functionalitypacked_fs.c- part of the device dashboard example, embeds the Web UI used by the dashboard
All these files have been grouped in Source Group 1 in the Project Explorer. Keil MDK can integrate with STM32CubeMX, and we use it. The device configuration file, used as the recipe to generate the code for device initialization, is handled by the IDE, we access it through the Run-Time Environment manager. For all auto-generated files, we've used those places designated for USER_CODE, so all files can be re-generated by STM32CubeMX for newer versions of the firmware packs.
References in this tutorial are for a Nucleo-F746ZG board
Below is a general process outline:
- The board IP addressing will be provided by a DHCP server. If you want to set a static configuration, set IP address, network mask and gateway in
main.c; see below - Build the example (see below) and run it on a development board
- The firmware initializes the RTOS; see RTOS integration below
- The firmware initializes the network
- After initialization, the application starts Mongoose's event loop and blinks a blue LED
- Once the blue LED starts blinking, the example is ready
- Open your web browser and navigate to the board IP address, you should see a nice device dashboard
Build and run
Follow the Build Tools tutorial to setup your development environment.
In your project directory, clone the Mongoose Library repository using git
Start μVision and open the project; if you need a quick start on the ARM Keil MDK and μVision, follow this step by step tutorial. This project is at
tutorials/stm32/nucleo-f746zg-keil-rtxIn order to build this project, click the
Buildicon. To flash this firmware to your board, plug it in a USB port and click on theLoadicon. When finished, you have to reset your board pressing its reset button. You should soon see the blue LED start blinking. As long as there is only one board plugged in, μVision will find it; though we need to know the serial port device to be able to get the log information. You'll need to dig for it in your computer.
When the firmware starts, the board should signal its state by blinking the blue LED. We now need to know the IP address of the board to connect to it. If we used DHCP, as it is the default, we can check our DHCP server logs or see the device logs. Let's do this.
To connect to the board, in this example we'll be using PuTTY; we configure it for 115200bps.
8      2 main.c:44:server               MAC: 02:35:42:56:22:2e. Waiting for IP...
...
1008   2 mongoose.c:7621:onstatechange  READY, IP: 192.168.69.234
100e   2 mongoose.c:7622:onstatechange         GW: 192.168.69.1
1014   2 mongoose.c:7625:onstatechange         Lease: 21600 sec
101a   2 main.c:49:server               Initialising application...
1021   3 mongoose.c:3607:mg_listen      1 0x0 http://0.0.0.0
1027   2 main.c:53:server               Starting event loop
Now start a browser on
http://IP_ADDRESS, whereIP_ADDRESSis the board's IP address printed on the serial console. You should see a login screen as in the image aboveFrom here on, if you want to try the dashboard features please go to the device dashboard tutorial and follow some of the steps depicted there.
Compilation options
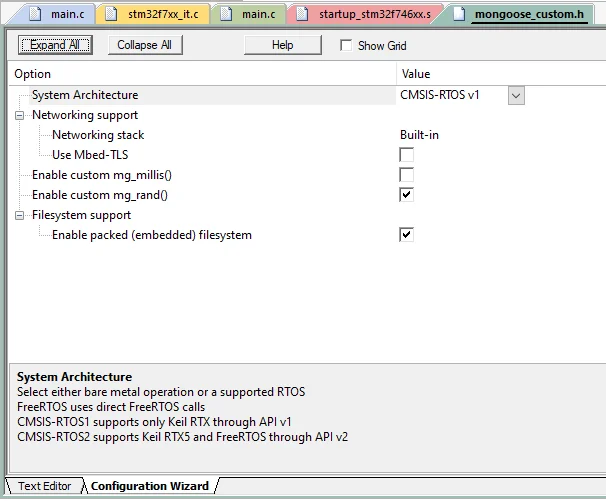
MG_ARCH = MG_ARCH_CMSIS_RTOS1- configures Mongoose to work with a supported RTOS using CMSIS-RTOS API v1MG_ENABLE_CUSTOM_RANDOM = 1- lets the firmware code overridemg_random()to use the device hardware RNGMG_ENABLE_TCPIP = 1- enables the built-in TCP/IP stackMG_ENABLE_PACKED_FS = 1- enables the embedded filesystem support- To enable the proper built-in driver for your board:
Board Compilation option NUCLEO-F429ZI MG_ENABLE_DRIVER_STM32F = 1NUCLEO-F746ZG MG_ENABLE_DRIVER_STM32F = 1NUCLEO-H743ZI MG_ENABLE_DRIVER_STM32H = 1NUCLEO-H743ZI2 MG_ENABLE_DRIVER_STM32H = 1
These are grouped in the file mongoose_config.h. This file has been written using scripting extensions, so you can just select the Configuration Wizard tab at the bottom of the editor to see the file contents in a friendly way.

main.c overview
This example can be divided in the following blocks:
- CMSIS-RTOS v1 (RTX) integration
- Stop the scheduler, initialize the microcontroller for this particular board and take advantage of the true RNG in the microcontroller
- Start the scheduler again, to run the desired tasks
- Initialize Mongoose
- Initialize the networking stack
- Run Mongoose
RTOS integration
Mongoose supports a number of well-known architectures, among them CMSIS-RTOS v1. To tell Mongoose in which architecture it is running, we need to define the macro MG_ARCH as we've seen above; we do this in mongoose_config.h.
Network operations need a time base to calculate timeouts; unfortunately the CMSIS-RTOS API v1 does not provide a suitable call returning elapsed ms or ticks, so Mongoose only supports RTX in this configuration; the time base will be provided by an RTX call. We need a 1000 Hz rate to provide a 1ms time base.
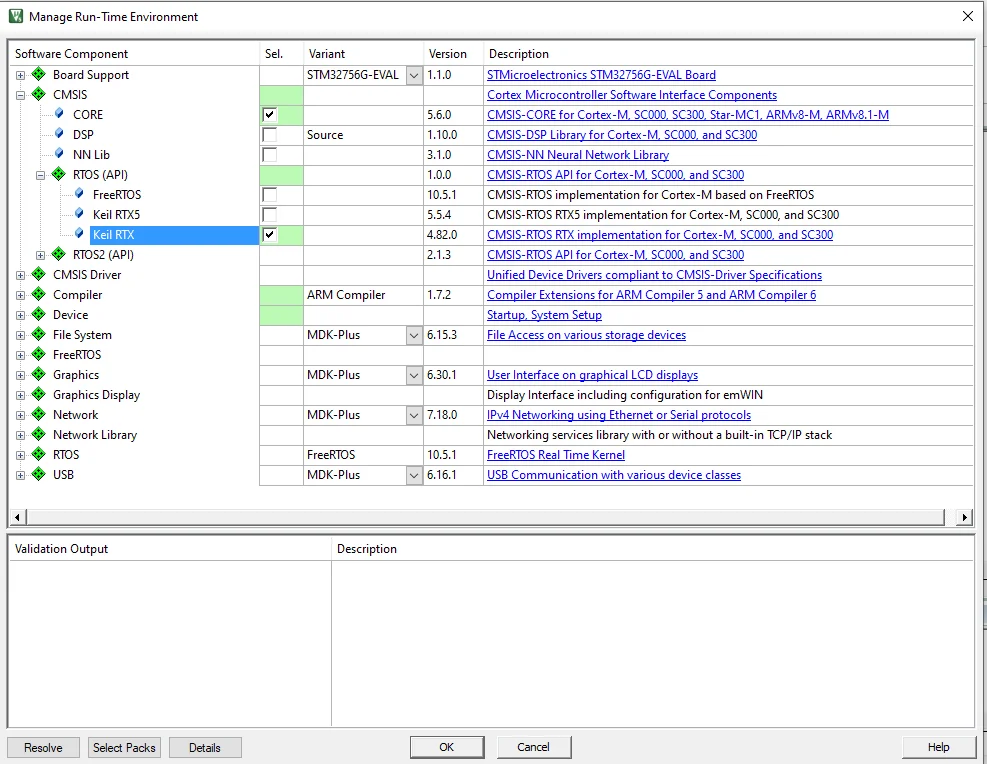
We need to add the proper libraries in our Run-Time Environment configuration; in the Run-Time Environment management window select
CMSIS -> RTOS (API) -> Keil RTX As you can see, we take advantage of the Keil packs.
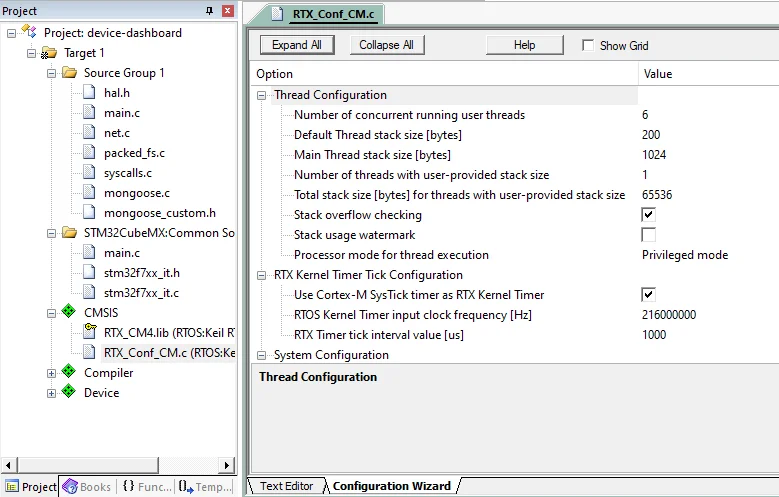
We configure RTX by opening its configuration file,
CMSIS/RTX_Config_CM.cin the Project Explorer, and choosing the Configuration Wizard tab in the lower left of the editor window. Most defaults are OK for this project, we set:Default Thread stack size [bytes] 200- this will be used by the blinker, leave the default as it only blinks an LEDMain Thread stack size [bytes] 1000- this one will be used by the STM32 HAL, and it requires a fair amount. It will be freed when we exit, anyway, so feel free to put any big number your initialization would require.RTOS Kernel Timer input clock frequency [Hz] 216000000- this is the MCU clock we configure, so for different boards you'll have different valuesRTX Timer tick interval value [us] 1000Number of threads with user-provided stack size 1- we specify stack size for the server thread that runs MongooseTotal stack size [bytes] for threads with user-provided stack size 65536- ample space for Mongoose and any other project task stack- uncheck
User Timers
One last thing to consider is the time base for the RTOS and the HAL. ARM suggests overriding the HAL timing call, ST in general suggests using separate timers; we chose the latter. As the RTOS uses the SWI, PendSV and SysTick IRQ handlers, we instructed Cube to not generate code for those at project creation, and to use one of the device timers as time base for the HAL. Of course, this can be changed later
In the project configuration (Project -> Options for Target 'Target 1'), in the C/C++ (AC6) tab, we've added Misc Controls: -Wno-macro-redefined to silence a warning due to CMSIS-RTOS headers clashing with compiler headers. The rest of the project settings are those we normally use
Custom mg_random()
Some network operations require the generation of random numbers, from simple port numbers that should be different on every reset to complex TLS operations. Mongoose supports a number of well-known architectures, but since here we are working at the bare-metal level, we need to provide our own custom function or default to the standard pseudo-random number generator. The necessary actions are:
- Define
MG_ENABLE_CUSTOM_RANDOM=1which is done inmongoose_config.h - Provide a custom
void mg_random(void *buf, size_t len)function:
In this example, this function uses the microcontroller's built-in RNG through the STM32Cube HAL provided in the Keil packs
MCU and board initialization
Microcontroller support is provided by Keil firmware packs, which are based on STM32Cube firmware packages. The microcontroller, its clock, and all peripherals we use are initialized by HAL functions according to the configuration, code like this is generated by STM32CubeMX. In fact, to reproduce all the configuration steps, follow the step by step tutorial up to and including step 5. In particular, step 1 describes the additions we need to do to a Cube-generated main file to call the generated initialization functions, this mx_init() function we call at the start of our main() function.
Perhaps you've noticed in the log above that it does not start at 0. That's because the RTX kernel has already been running when the task starts, actually it calls our main() function (that becomes the main task, instead), so to initialize the MCU we need to stop the kernel and restart it later
Since this is a CMSIS-RTOS v1 project, task stack allocation will be done through it; dynamic memory allocation still will be done through system calls so we need a system heap. We've left the initial stack allocation at a small value (1KB), and setup enough heap room at project creation; that can be seen/modified by opening the assembly startup file (Device/startup_<devicefamilyname>.s) in μVision and then use the Configuration Wizard. This setting affects the linker process.
Create tasks and restart scheduler
At the main task we create the necessary tasks, call the function that starts the scheduler, and exit. Then, we have a server task, where we initialize and run Mongoose, and a blinker task to blink an LED
Note we provide ample stack space for the Mongoose task. It doesn't actually need to be that big for such a simple example, but more complex interfaces will need plenty of room.
Mongoose initialization
In the server task we initialize Mongoose; this is no different from what we always do in any example; we are a task in an RTOS and we can run an infinite loop.
TCP/IP initialization
The built-in TCP/IP stack has to be enabled to be compiled in, and so Mongoose will work in association with it. This is done in mongoose_config.h by defining MG_ENABLE_TCPIP=1.
Then this networking stack has to be configured and initialized. This is done by calling mg_tcpip_init() and passing it a pointer to a struct mg_tcpip_if. Inside this structure:
- have pointers to a
struct mg_tcpip_driverand any extra data that it could need - For DHCP: set
ipas zero - For a static configuration, specify
ip,mask, andgwin network byte order
In this example we use DHCP, but you can remove the comments and set a static configuration if you want:
Note that, we also need to specify a unique MAC address; this example provides a macro to transform the chip built-in unique ID into a unicast locally administered address; for production runs you'll have to consider among several options, from adding a MAC address chip in your hardware design to registering with the IEEE Registration Authority.
Some drivers, as you have probably noticed, require extra data. In this case the STM32 driver can accept the setting for the divider that generates the MDIO clock. You can pass a null pointer in the driver data or a negative value for this parameter and the driver will calculate it for you, based on the clock configuration.
As you can see, there are no multi-threading issues to worry about, just follow Mongoose documentation as usual and call all mg_* API functions from the same task where Mongoose is running.
Run Mongoose
Then we run Mongoose. This is no different from what we always do in any example, though note that it should be run after network initialization. The logic is standard: initialize the event manager (as we already did), start a listener, and fall into an infinite event loop:
In this case, the listener is started by web_init(), the device dashboard initialization function. The URL is configured by the macro HTTP_URL, which we defined as a preprocessor symbol.
Blinker task
This is a simple task that toggles the GPIO and loops, to blink the blue LED
We have covered those aspects that are specific to the STM32 implementation, for the details on the application and the UI, please see the Device Dashboard tutorial.
Differences among supported RTOSes
Currently Mongoose only supports RTX (v4) in this configuration. If you want to use any other RTOS (like RTX5 or FreeRTOS) with CMSIS-RTOS API v1, you can do it, just define MG_CUSTOM_MILLIS and add a function uint64_t mg_millis(void) that calls the HAL, as we did for the baremetal example. Due to very strong differences in these OSs, we recommend using CMSIS-RTOS API v2 for any RTOS different than RTX (v4).
For the specific case of FreeRTOS, you can also just configure Mongoose to use native FreeRTOS calls, refer to this tutorial for integration.


 Mongoose