


Device dashboard with CubeIDE, FreeRTOS and lwIP
Overview
This tutorial shows how to implement a Web device dashboard using Mongoose Library over FreeRTOS and lwIP on STM32 Nucleo development boards, using the STM32CubeIDE development environment.

Features of this implementation include:
- Uses FreeRTOS, lwIP, ARM CMSIS Core and device headers through STM32Cube packages
- The Web dashboard provides:
- User Authentication: login protection with multiple permission levels
- The web UI is optimized for size and for TLS usage
- Logged users can view/change device settings
- The web UI is fully embedded into the firmware binary, and does not need a filesystem to serve it, making it resilient

This example is a hardware adaptation of the Device Dashboard that can run on Mac/Linux/Windows. Mongoose Library, being cross-platform, allows to develop and run the same code on different platforms. That means: all functionality related to networking can be developed and debugged on a workstation, and then run as-is on an embedded device - and this example is a demonstration of that.
Take your time to navigate and study the Device Dashboard tutorial. Here, we concentrate on the features specific to this embedded platform in the STM32Cube environment.
Though we specifically link to the files for a NUCLEO-F746ZG implementation, most references in this tutorial are valid for any supported board:
| Board | Files |
|---|---|
| NUCLEO-F429ZI | examples/stm32/nucleo-f429zi-cube-freertos |
| NUCLEO-F746ZG | examples/stm32/nucleo-f746zg-cube-freertos |
This example is a plain STM32Cube-based project with the following files of interest:
- Core/Src/main.c - provides the
main()entry point with hardware init, LED blinking and network init. It is generated by Cube and we add our logic in it. - Core/Inc/hal.h - provides an abstraction for MAC generation
- Core/Src/syscalls.c - provides low level functions expected by the ARM GCC C library. It is generated by Cube and we've modified the _write() function to redirect debug output to a UART.
Core/Src/mongoose.c,Core/Inc/mongoose.h- Mongoose LibraryCore/Src/net.c,Core/Inc/net.h- part of the device dashboard example, contains the Web functionalityCore/Src/packed_fs.c- part of the device dashboard example, embeds the Web UI used by the dashboardnucleo-f746zg-cube-freertos-lwip.ioc- the device configuration file. This file is used as the recipe to generate the code for drivers, middleware, and device initialization
For all auto-generated files, we've used those places designated for USER_CODE, so all files can be re-generated by STM32CubeIDE or STM32CubeMX for newer versions of the STM32Cube firmware packages.
References in this tutorial are for a Nucleo-F746ZG board
Below is a general process outline:
- The board IP addressing will be provided by a DHCP server. If you want to set a static configuration, do not configure lwIP for DHCP; see below
- Build the example (see below) and run it on a development board
- The firmware initializes FreeRTOS and the network; see FreeRTOS and lwIP integration below
- After initialization, the application starts Mongoose's event loop and blinks a blue LED
- Once the blue LED starts blinking, the example is ready
- Open your web browser and navigate to the board IP address, you should see a nice device dashboard
If you need a quick start on Cube itself, or on using FreeRTOS with Cube, follow this step by step tutorial.
Build and run
Follow the Build Tools tutorial to setup your development environment.
Clone the Mongoose Library repository using git
Start STM32CubeIDE and import the project into your workspace; this project is at
examples/stm32/nucleo-f746zg-cube-freertos-lwipIn order to build and flash this firmware to your board, plug it in a USB port and click on the green arrow icon. You should soon see the blue LED start blinking. As long as there is only one board plugged in, Cube will find it; though we need to know the serial port device to be able to get the log information. In Linux it is probably
/dev/ttyACM0When the firmware is flashed, the board should signal its state by blinking the blue LED. We now need to know the IP address of the board to connect to it. If we used DHCP, as it is the default, we can check our DHCP server logs or see the device logs. Let's do this.
To connect to the board, in this example we'll be using picocom; we configure it for 115200bps. Use the proper serial device.
picocom /dev/ttyACM0 -i -b 115200
picocom v2.2
...
Terminal ready
...
7d8    2 main.c:375:StartDefaultTask    Waiting for IP...
1b66   2 main.c:379:StartDefaultTask    READY, IP: 192.168.100.26
1b6c   2 main.c:350:server              Initialising application...
1b72   3 mongoose.c:3356:mg_listen      1 0x0 http://0.0.0.0
1b78   2 main.c:354:server              Starting event loop
Now start a browser on
http://IP_ADDRESS, whereIP_ADDRESSis the board's IP address printed on the serial console. You should see a login screen as in the image aboveFrom here on, if you want to try the dashboard features please go to the device dashboard tutorial and follow some of the steps depicted there.
Compilation options
MG_ARCH=MG_ARCH_FREERTOS- configures Mongoose to work with FreeRTOSMG_ENABLE_LWIP=1- configures Mongoose to work with lwIPMG_ENABLE_CUSTOM_RANDOM=1- lets the firmware code overridemg_random()to use the device hardware RNGMG_ENABLE_PACKED_FS=1- enables the embedded filesystem supportMG_ENABLE_POSIX_FS=0- disables filesystem usage not provided in syscalls.c
These are grouped in the file Core/Inc/mongoose_config.h.
main.c overview
This example can be divided in the following blocks:
- FreeRTOS and lwIP integration
- Initialize the microcontroller for this particular board and take advantage of the true RNG in the microcontroller
- Start the FreeRTOS scheduler to run the desired tasks, including lwIP
- Initialize Mongoose
- Run Mongoose
FreeRTOS and lwIP integration
Mongoose supports a number of well-known architectures, among them FreeRTOS. To tell Mongoose in which architecture it is running, we need to define the macro MG_ARCH and enable a known TCP/IP stack, as we've seen above; we do this in mongoose_config.h.
Network operations need a time base to calculate timeouts; this will be provided by FreeRTOS and Mongoose now knows how to call it. We need a 1000 Hz rate to provide a 1ms time base, and that is the default for Cube.
Cube provides both CMSIS-RTOS abstraction APIs, we'll configure it for version 1, as some versions of the Cube packages do not work with lwIP when using version 2. We also need to set the amount of memory we'll use for the main heap. Task memory allocation defaults to dynamic. This means that memory for the stack of each new task will be allocated from the FreeRTOS heap, so we need to provide a suitable amount of memory.
Note we also create a Blinker task to blink the LED. We will create the server task in run time.
- At the device configuration wizard, select the
Pinout & Configurationtab. Click onMiddleware and Software Packs, then onFREERTOS, and finally selectCMSIS_V1as interface: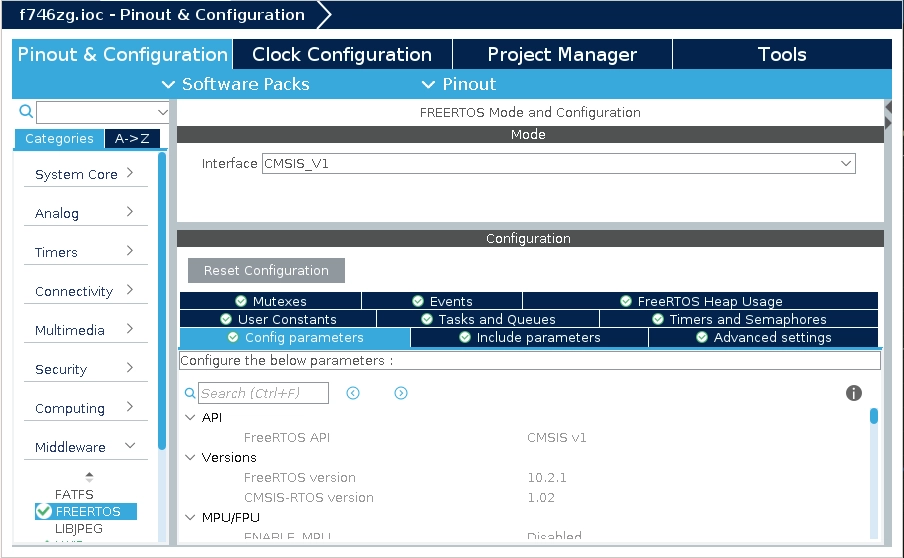
- In the Config Parameters section configure the
TOTAL_HEAP_SIZE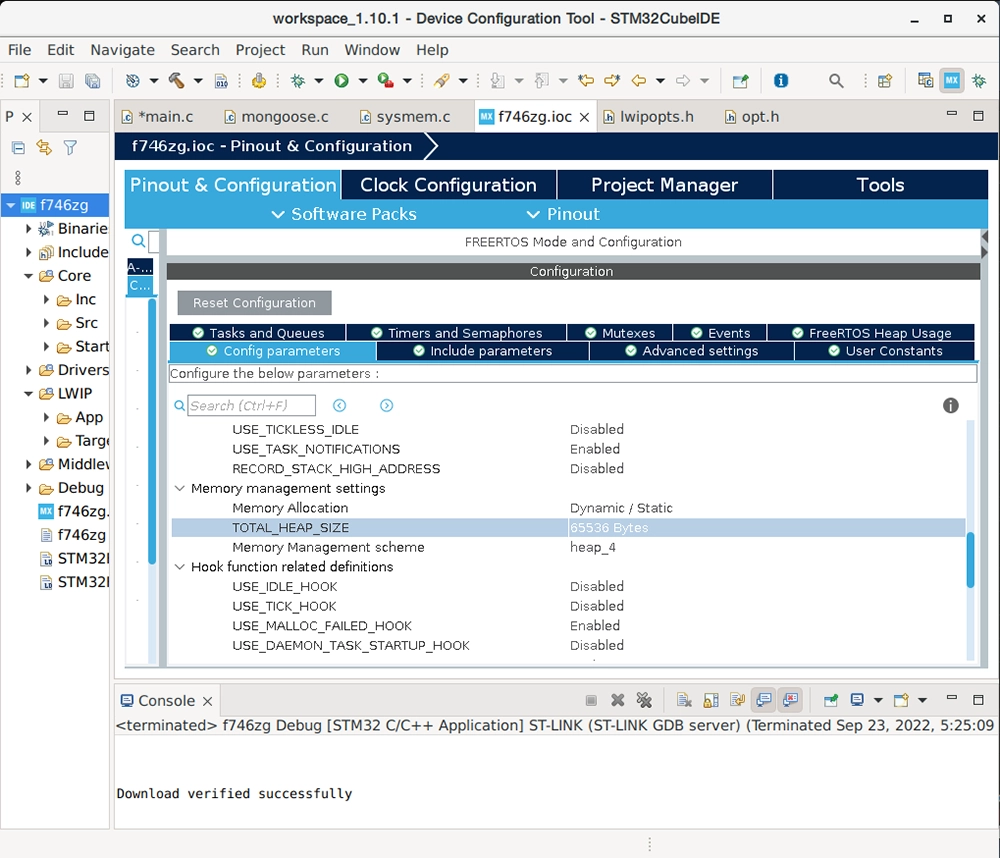
- In the Tasks and Queues section, set the stack size for defaultTask to 256 words; otherwise lwIP won't start. Then add a "Blinker" task with osPriorityLow:

- Now click on the Advanced settings section, then, on
Newlib settings, enableUSE_NEWLIB_REENTRANT: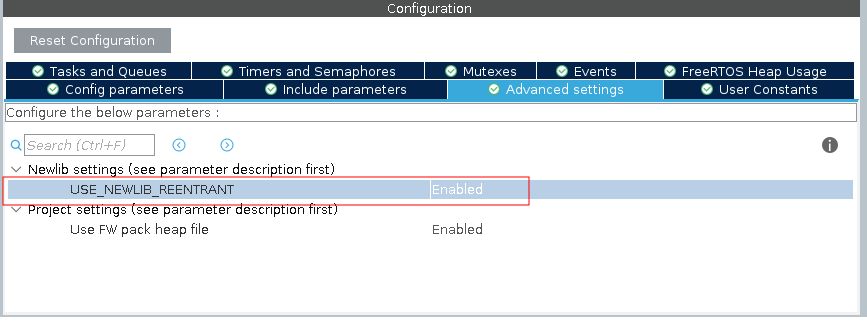
- Let's now go for lwIP. On
Middleware and Software Packsclick onLWIPand enable it. Make sure DHCP is enabled: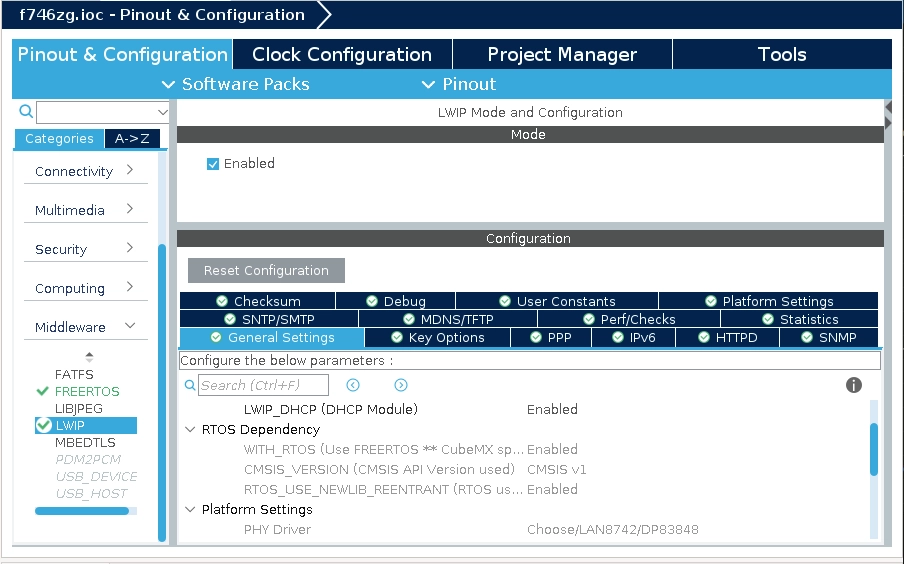
- Now click on the Platform Settings section, then on
Driver_PHYselectLAN8742: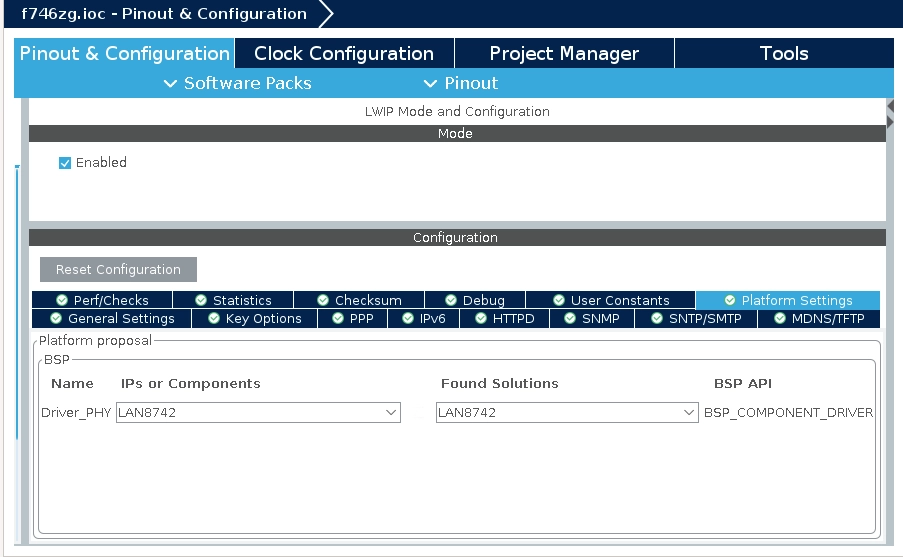
As you can see, we take advantage of the Cube packages.
- One last point to consider is that since we'll be using several connections simultaneously, we need to tell lwIP so. Even though we are using the socket interface, internally lwIP uses a decoupling API called netconn, so we'll set the number of allowed connections high enough; let's set
MEMP_NUM_NETCONN=10in the preprocessor symbols: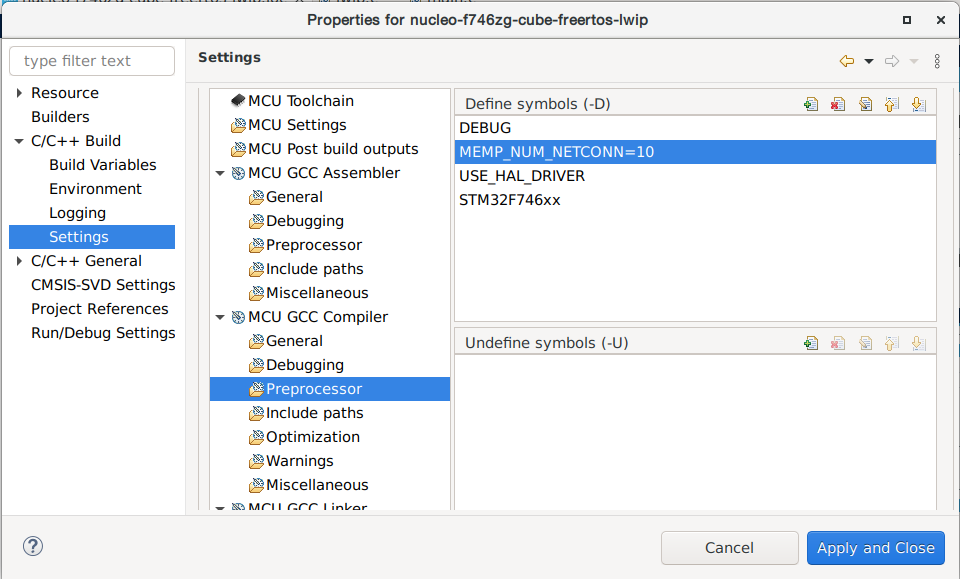 We didn't change any other default lwIP parameters, for serious work and performance, a tuning operation might be needed.
NOTE: Some versions of the Cube packages may not properly setup the lwIP netif interface up in DHCP mode; we have corrected for this situation in the example code
As a side note, the Cube packages provide a fixed MAC address that can be manually configured in the device configuration wizard. We have added user code to LWIP/Target/ethernetif.c to use a MAC address based on the chip UUID
Custom mg_random()
Some network operations require the generation of random numbers, from simple port numbers that should be different on every reset to complex TLS operations. Mongoose supports a number of well-known architectures, but since here we are working at the bare-metal level, we need to provide our own custom function or default to the standard pseudo-random number generator. The necessary actions are:
- Define
MG_ENABLE_CUSTOM_RANDOM=1which is done inmongoose_config.h - Provide a custom
void mg_random(void *buf, size_t len)function:
In this example, this function uses the microcontroller's built-in RNG through the STM32Cube HAL
MCU and board initialization
Microcontroller support is provided by STM32Cube firmware packages. The microcontroller, its clock, and all peripherals we use are initialized by HAL functions according to the configuration, code like this can be generated by either the Device Configuration Tool in STM32CubeIDE or by STM32CubeMX. In fact, to reproduce all the configuration steps, follow the step by step tutorial up to and including step 5.
Since this is a FreeRTOS project, task memory allocation will be done through it. We've left the initial stack and heap allocation at default values as selected by Cube.
Start scheduler and lwIP
The auto-generated code creates the tasks and calls the function that starts the scheduler. Then, FreeRTOS takes over and will call the tasks we configured above.
The defaultTask in turn will initialize lwIP and related Ethernet tasks for us; all this will be handled by Cube auto-generated code.
There we added code to wait until we obtain an IP address, and then create the Server task that will initialize and run Mongoose.
Note we assigned ample stack space for it.Mongoose initialization
In the Server task we initialize Mongoose; this is no different from what we always do in any example; we are a task in FreeRTOS and we can run an infinite loop.
Run Mongoose
Then we run Mongoose. This is no different from what we always do in any example, though note that it should be run after network initialization. The logic is standard: initialize the event manager (as we already did), start a listener, and fall into an infinite event loop:
In this case, the listener is started by web_init(), the device dashboard initialization function. The URL is configured by the macro HTTP_URL, which we defined as a preprocessor symbol.
Blinker task
This is a simple FreeRTOS task that toggles the GPIO and loops, to blink the blue LED
We have covered those aspects that are specific to the STM32 implementation, for the details on the application and the UI, please see the Device Dashboard tutorial.