


UART Bridge
Overview
This tutorial shows an example of how to send UART data over the network. A real bridge can be built using two devices, though in this tutorial we'll only cover one side of it.

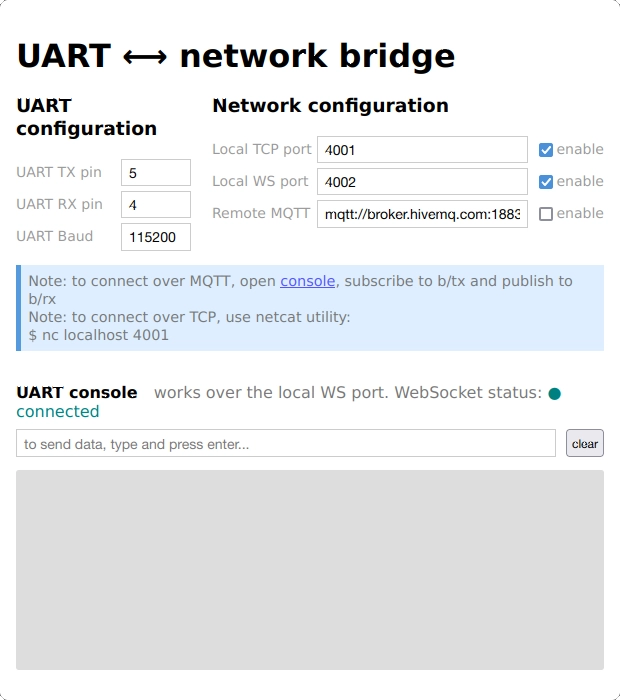
There is also a small device dashboard with a UI developed using the Preact framework, so the working parameters can be configured at run time. For more information on the details of building a device dashboard, check its tutorial.
In this example we employ a hybrid server architecture which serves both static and dynamic content. Static files, like CSS/JS/HTML or images, are compiled into the server binary, in order to not rely on nor require that a filesystem be present on the device.
Packing serial data into network messages is something that can be traced back several decades, the most common ways of doing this involve buffering incoming data until a buffer is filled or
- a reasonable time elapses after the last character was received
- a special character is received
- some time has elapsed
In this example, we'll use the third option and use a repeating timer to get whatever has been buffered by the UART driver, and send it to our connected clients. The time slice chosen is short enough so the UART buffer won't fill up.
Receiving network messages and sending them to a UART is a bit simpler, as long as we have only one active connection. In this example we'll have several connections and all can be active at the same time, so it is up to the user not to mix the flows.
This example uses an MQTT client, so the UART data can be sent to an MQTT broker on a specific topic, and messages published on another topic will be sent to the UART.
This example uses a WebSocket server and a TCP server, so there can be traffic exchange back and forth to the UART over those transports.
For demo purposes, the UART interface is simulated using the standard input and output, for implementations on actual hardware check the ESP32 tutorial
REST API
The RESTful server API is only for configuration, it provides the following endpoints:
/api/hi- returns "hi", serves as a test point/api/config/get- returns the device configuration as a JSON object/api/config/set- sets a configuration variable. A variable is urlencoded text in the POST body
WebSocket server
The WebSocket server is only for data transport; it listens on a configured port and has no specific URI, nor API. Data coming in is sent to the UART as is; data coming from the UART is sent as is.
TCP server
The TCP server is only for data transport; it just listens on a configured port. Once connected, data coming in is sent to the UART as is; data coming from the UART is sent as is.
Build and try
- Follow the Build Tools tutorial to setup your development environment.
- Start a terminal in the project directory; if you've not already done so, clone the Mongoose Library repo
git clone https://github.com/cesanta/mongoose - Build the example, this will also start Mongoose:
cd mongoose/tutorials/http/uart-bridge make clean all - Start your browser on
http://localhost:8000, the main page is loaded; the JavaScript code on the web page GETs the configuration from/api/config/get, renders the UI, and connects to the WebSocket server (if enabled).
Type anything on the shell window (only for non-Windows users), you'll see that rendered on the UI. Note that since the standard input is usually line oriented, you'll need to hit the ENTER key for the message to be read and processed.
Conversely, send a message on the UI and you'll see it at the shell window
We can simulate getting the configuration manually by connecting to the REST API with curl, for example:
curl localhost:8000/api/config/get
{"tcp":{"url":"tcp://0.0.0.0:4001","enable":true},"ws":{"url":"ws://0.0.0.0:4002","enable":true},"mqtt":{"url":"mqtt://broker.hivemq.com:1883?tx=b/tx&rx=b/rx","enable":false},"rx":4,"tx":5,"baud":115200}
To manually change the configuration, we can manually call the REST API, as the UI would do:
curl localhost:8000/api/config/set -d '{"mqtt": {"enable": true}}'Now let's manually connect to the WebSocket server with a WebSocket client like for example wscat; anything we type here will show on the shell window and what we type on the shell window will show both here and on the UI window.
wscat --connect localhost:4002
Connected (press CTRL+C to quit)
<
Let's connect to the TCP server with a client like for example nc; anything we type here will show on the shell window and what we type on the shell window will show here, on the UI window, and also on the WebSocket client (if we didn't close it)
nc localhost 4001Since we enabled the MQTT client above, let's send a message to the device via MQTT. We can do that using any MQTT client, for example mosquitto_pub, part of the Mosquitto broker package, by publishing to the configured topic:
mosquitto_pub -h broker.hivemq.com -t "b/rx" -m "hello"If for some reason you don't have an MQTT client at hand, you can use HiveMQ's WebSocket client
With any MQTT client, subscribe to the configured topic; anything you type on the shell window will also be received here:
mosquitto_sub -h broker.hivemq.com -t "b/tx"
NOTE: As we are using a public broker, and Mongoose is a widely tried product, you may see messages from other users while trying these.
Periodic UART read
This is done with a repeating timer. Its event handler function takes care of keeping servers active; then calls the UART driver to get any outstanding data and then iterates over all connections, replicating this data over all connections we've marked for this. This connections are either WebSocket, TCP, or MQTT, and we'll see how we mark them in the paragraphs below.
We'll cover timer initialization below; for more information on timers, check the timers tutorial.
WebSocket server
The WebSocket server listens on the configured port. HTTP Requests are upgraded to a WebSocket connection using the mg_ws_upgrade() function. Every time a connection is established, we mark it so we can later send data coming from the UART to it. Then, any data contained in incoming WebSocket messages is sent to the UART.
The timer event handler function starts the HTTP listener if it is enabled; by calling the mg_http_listen() function, as we've seen above. For more information on WebSocket servers, check the corresponding tutorial.
TCP server
The TCP server listens on the configured port. Every time a connection is established, we mark it so we can later send data coming from the UART to it. Any data handed over by the TCP/IP stack will trigger an MG_EV_READ event and there it will be sent to the UART.
The timer event handler function starts the TCP listener if it is enabled; by calling the mg_listen() function, as we've seen above
For more information on TCP servers, check the corresponding tutorial.
MQTT client
The MQTT client also marks the connection when established, so we can later send data coming from the UART to it. Then it subscribes to the configured topic using the mg_mqtt_sub() function. When it receives a message, it sends that data to the UART
The timer event handler function creates the MQTT client connection if it is NULL (and enabled); by calling the mg_mqtt_connect() function, as we've seen above
Check the MQTT client tutorial for a more in deep description.
RESTful API
The RESTful server makes use of mg_match() for URI matching, and mg_http_reply() to generate responses. Here, the %m extension calls mg_print_esc() that simplifies printing JSON strings.
Then, messages are parsed for desired values using Mongoose's built-in JSON API:
For MQTT, the UI handles us the topics as parameters within the POST URI, so we extract them out:
main() and init
The main() function maintains a structure similar to that of an HTTP server, in which we just initialize an event manager and
start the event loop, as usual.
The timer that will perform data sampling and maintain WebSocket and TCP server and MQTT client connections active, is initialized by the server event handler at creation time, that is, when the HTTP server is initialized. At that time, the handler function will receive an MG_EV_OPEN event:
The UART is also initialized here.
UI files and embedded filesystem
When you connect your browser to http://localhost:8000, it will ask to GET the index file, which contains references to JavaScript files, including the Preact code, and images. All these are static files and are served by the static server section of our hybrid server architecture. The event handler function calls the mg_http_serve_dir() function when it receives an MG_EV_HTTP_MSG event for a non-API URI:
Here you can decide at compile time if you will serve files from a directory or use a copy that has been embedded in the binary.
All the static files are compiled into the server binary, maintaining the directory structure. At run time, a file system virtualization layer in Mongoose extracts the requested file contents from this packed directory. For more information, check the embedded filesystem tutorial
UART HAL
We use a set of functions to read, write, and initialize the UART; and two additional functions to read and write the configuration to a non-volatile medium.
For this example, we just simulate a serial interface using the standard input and output. In an actual implementation, these functions will interface to the target device environment.
UI overview
The UI is developed using the Preact framework, an alternative to React with the same modern API and a smaller footprint, ideal to fit on small devices with limited room for flash memory. Once served via the HTTP server, it will run on the browser.
An event handler function, called when the page gets loaded, keeps the connection to the WebSocket server always open. When something arrives, the onmessage method will be invoked, then we update the log via its setter:
At this time, the configuration is also fetched by GETing the /api/config/get URI, extracting its JSON content and updating a state variable via its setter:
The generated HTML code will call the following functions to update the configuration state variable. They will also call onchange() when done, then we'll POST to the /api/config/set URI:
Note that since the checkbuttons only have an onchange property, we call onchange() after updating the configuration.
When the user wants to send something to the UART, we update the log via its setter and send the data verbatim over the WebSocket connection, just adding a line feed at the end
For more details on Preact-based user interfaces, check the corresponding tutorial